Make a Custom Photo Frame using Premium Creative Tools & Proofgrade® Medium Plywood
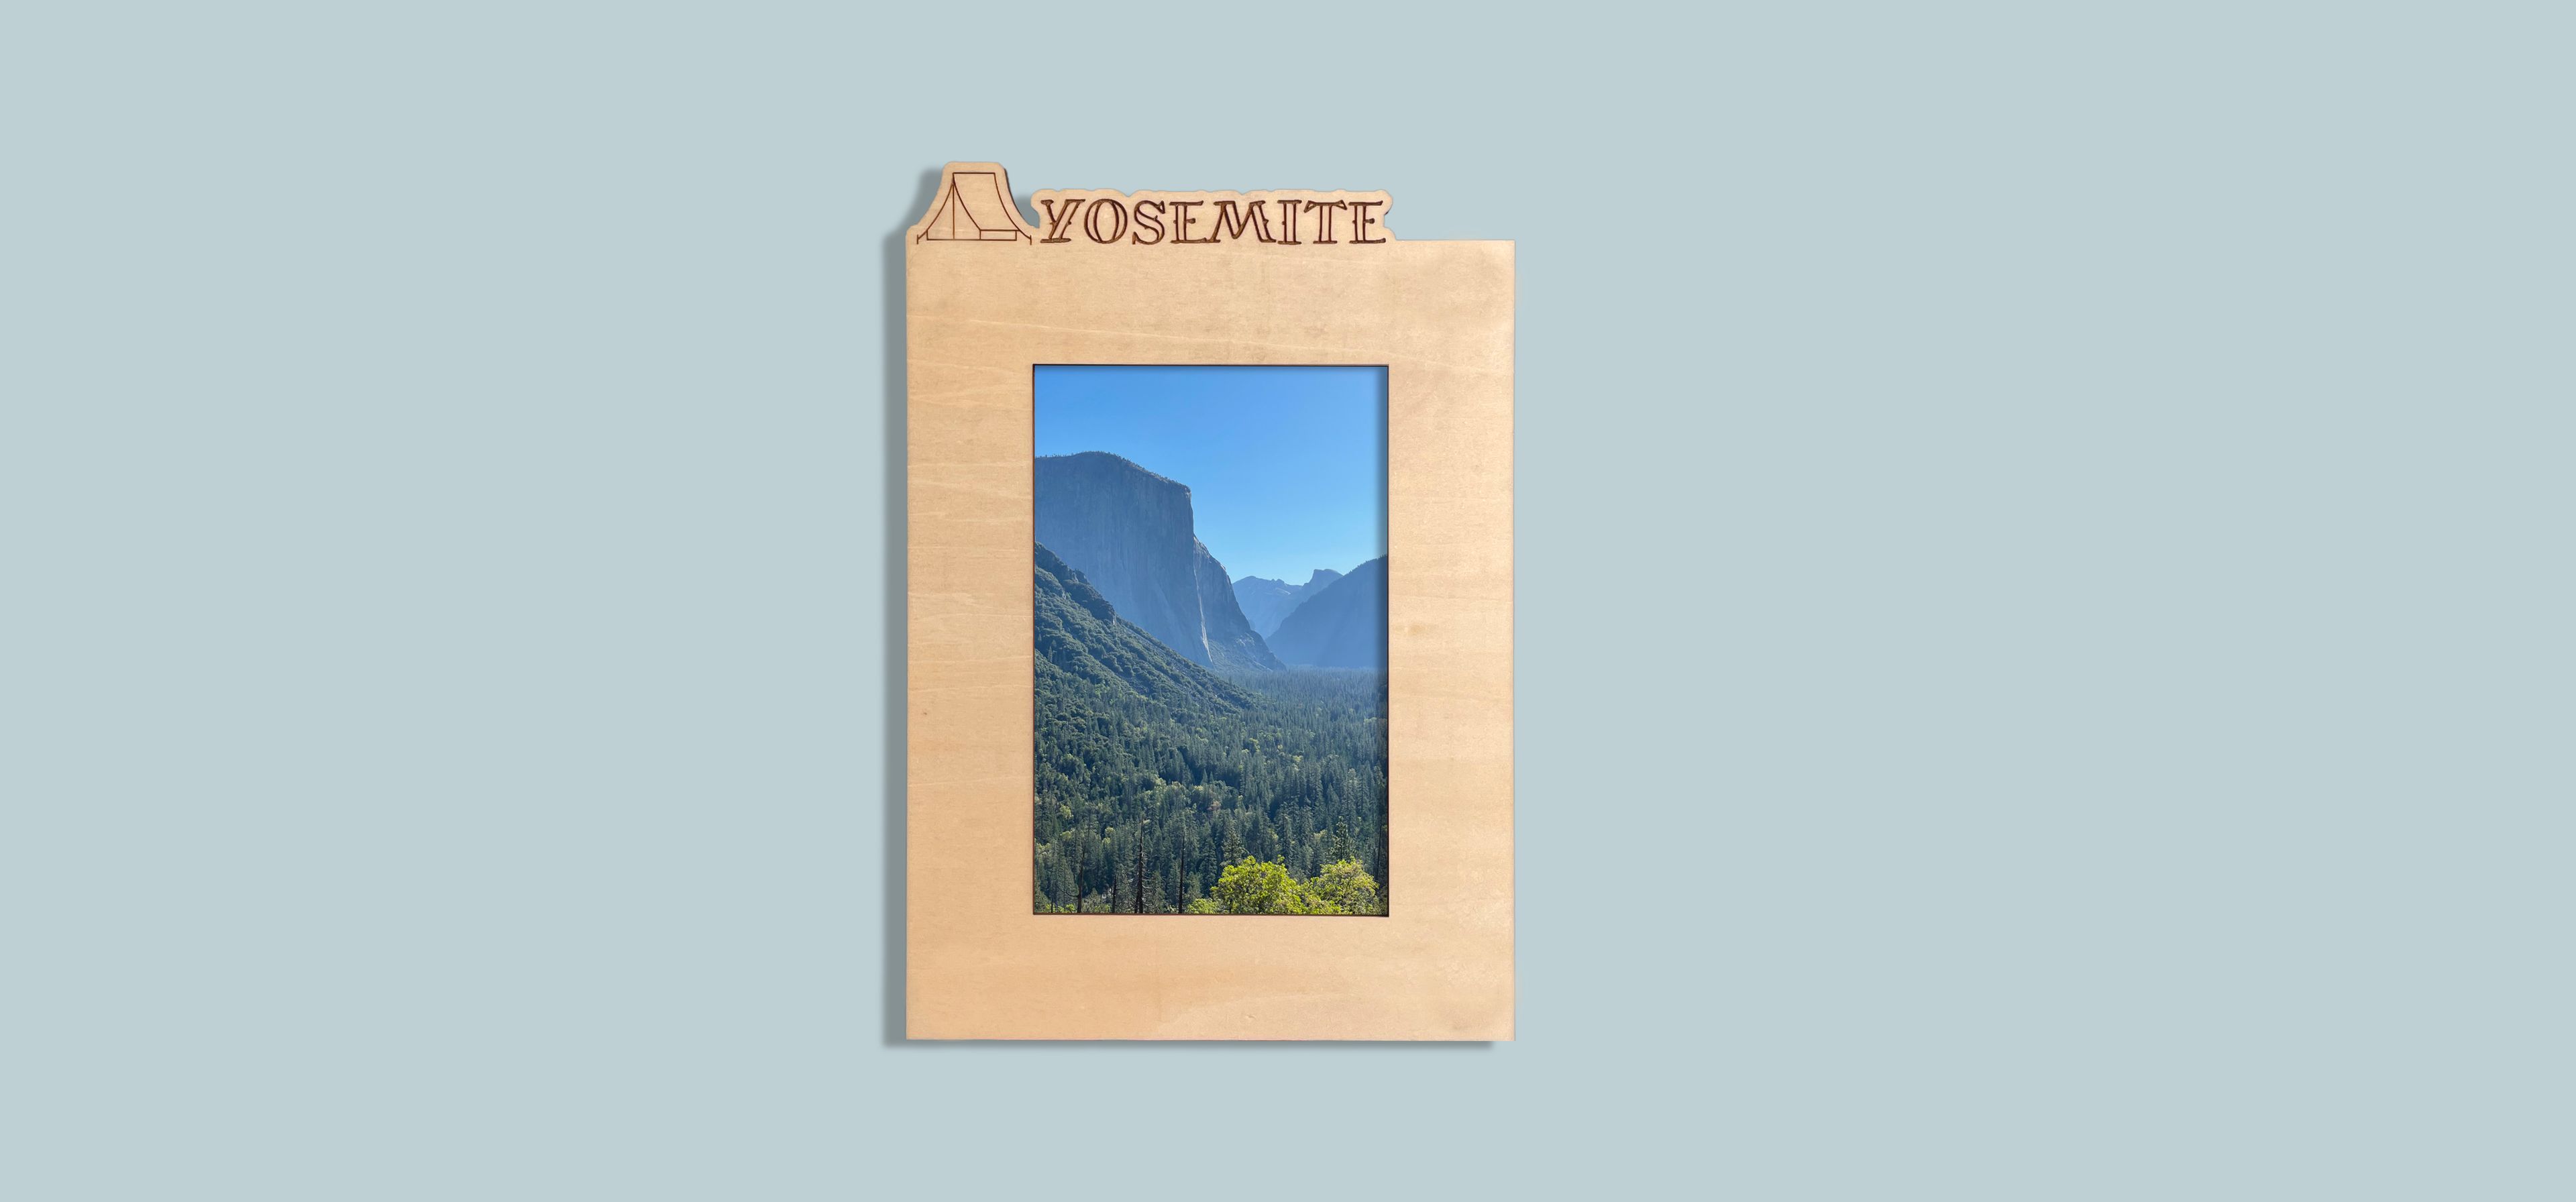
In this tutorial, we'll show you how to make a custom photo frame. You'll use Proofgrade® Medium Plywood and the text, artwork, and outline features in Premium.
Tip: Once you’ve created your frame, use this Elegant Art Stand from the Catalog to display it.
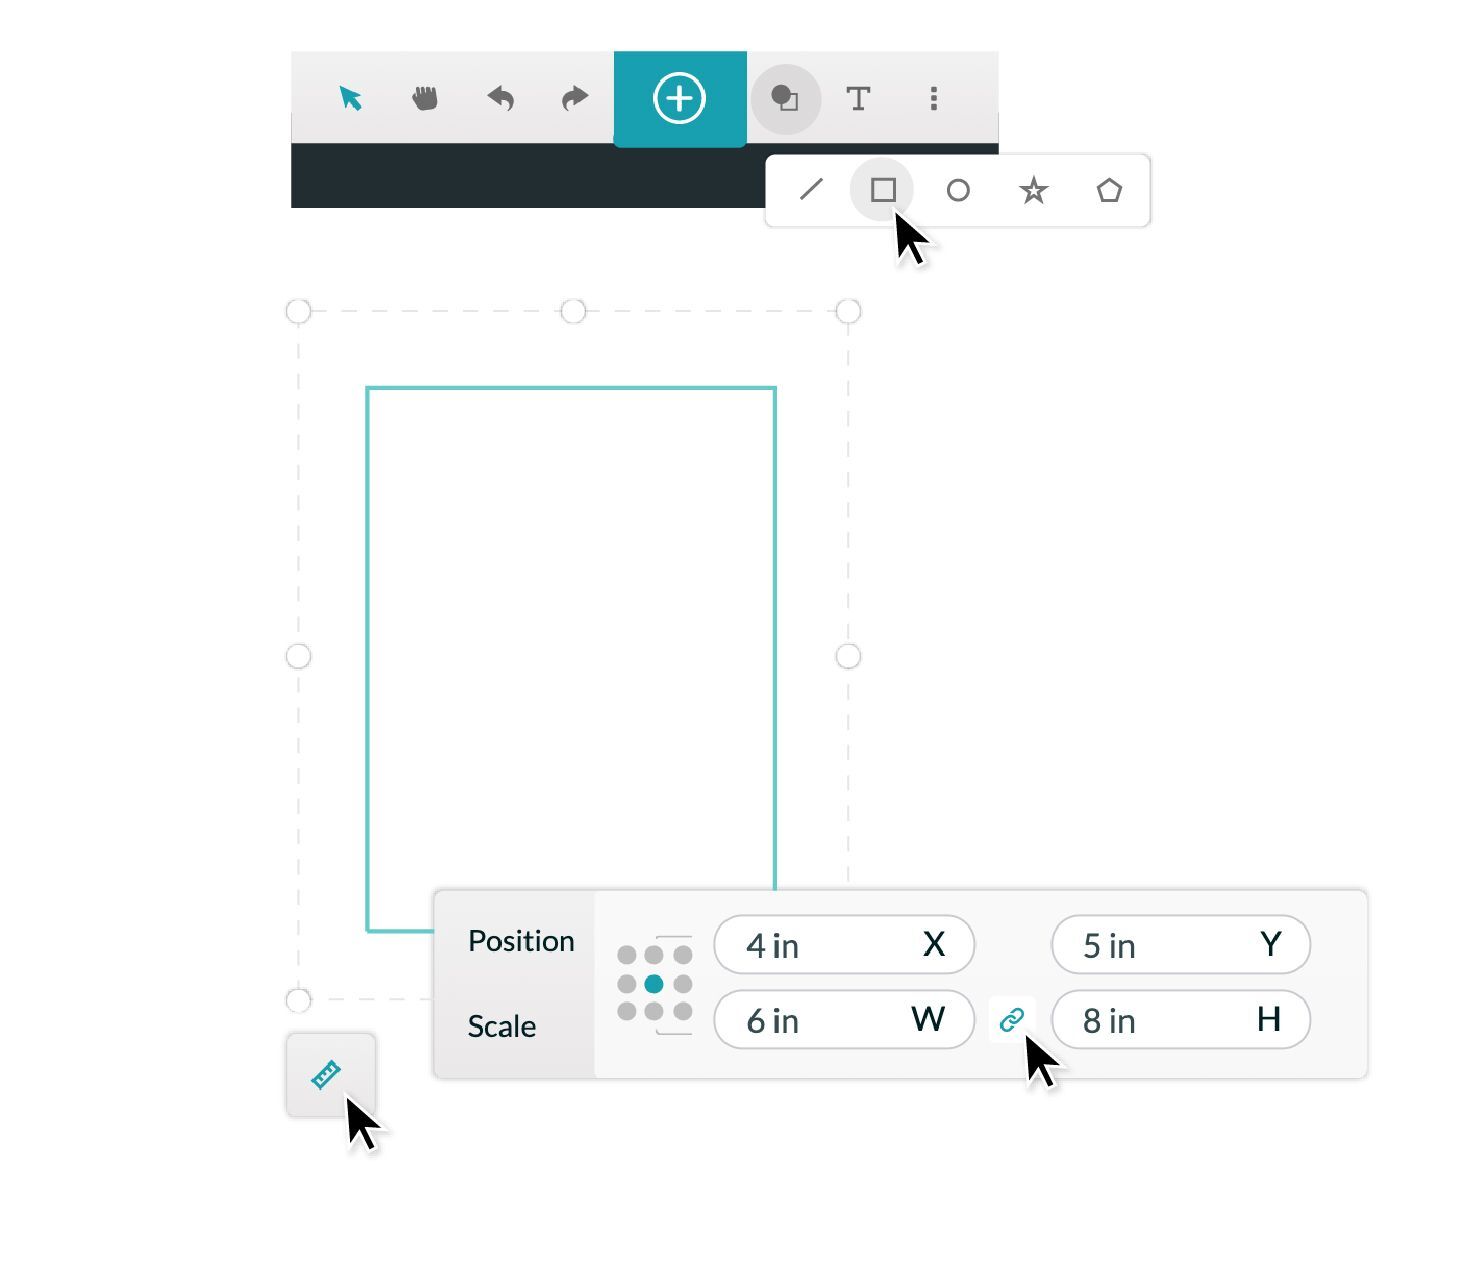
First, create the basic frame.
- You’re creating this design from scratch, so on the Dashboard, click Create a new design, and then click Create a blank design.
- In the workspace, on the top menu bar, click Insert shape, and then click Insert square.
- Once the square appears in your workspace, click the ruler button (Reposition and resize selected artwork) in the bottom left.
- To add the dimensions you want, first make sure that the Lock aspect ratio is turned off. Click the chain button to change this option.
- In the Scale text boxes, set the length to 6 in, and height to 8 in.
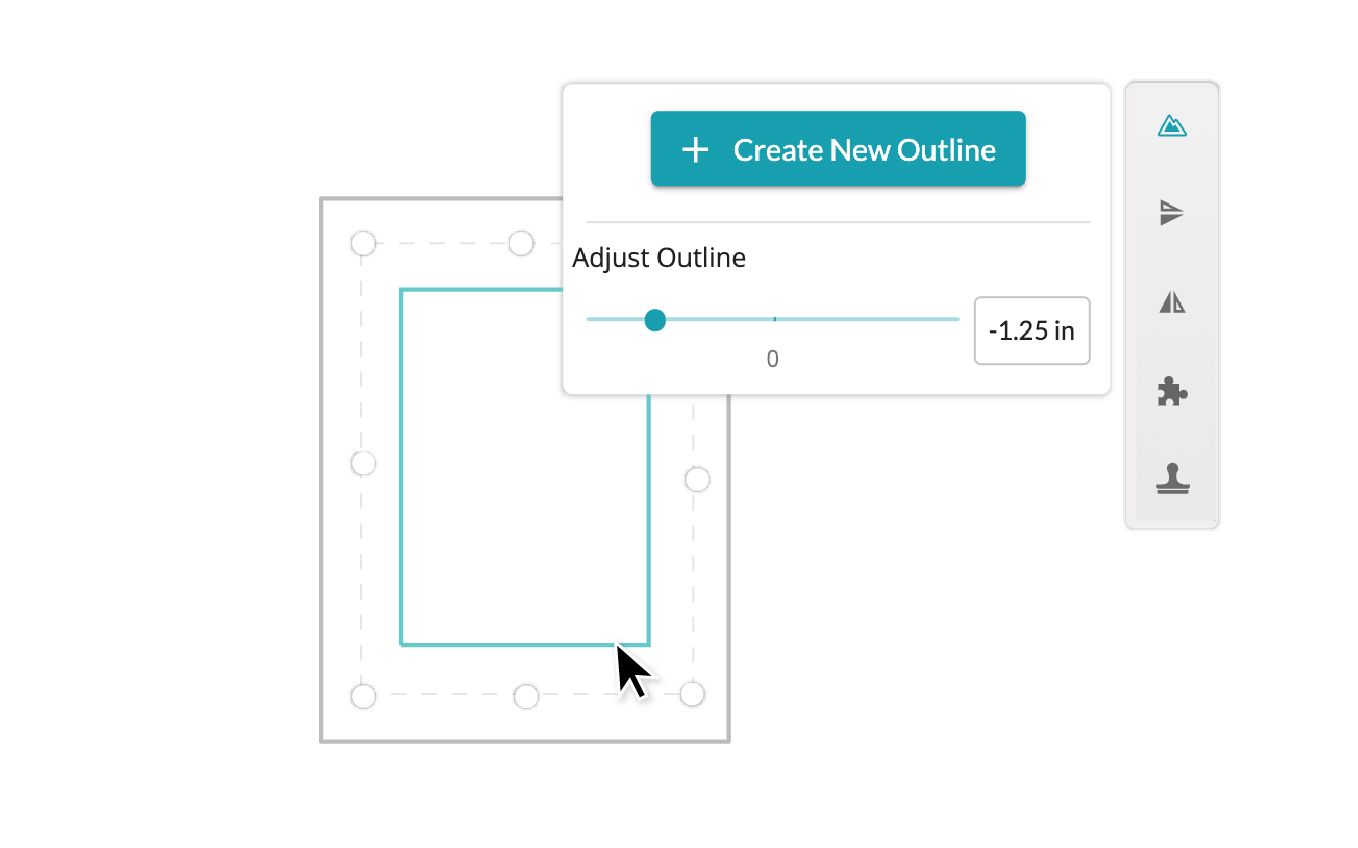
- To create the opening for your photo, click to select your rectangle, and then in the menu on the right, click Create outline.
- Click Create New Outline, and then move the Adjust Outline slider to -1.25 in.
Tip: You can also type the outline setting in the text box.
 Add artwork
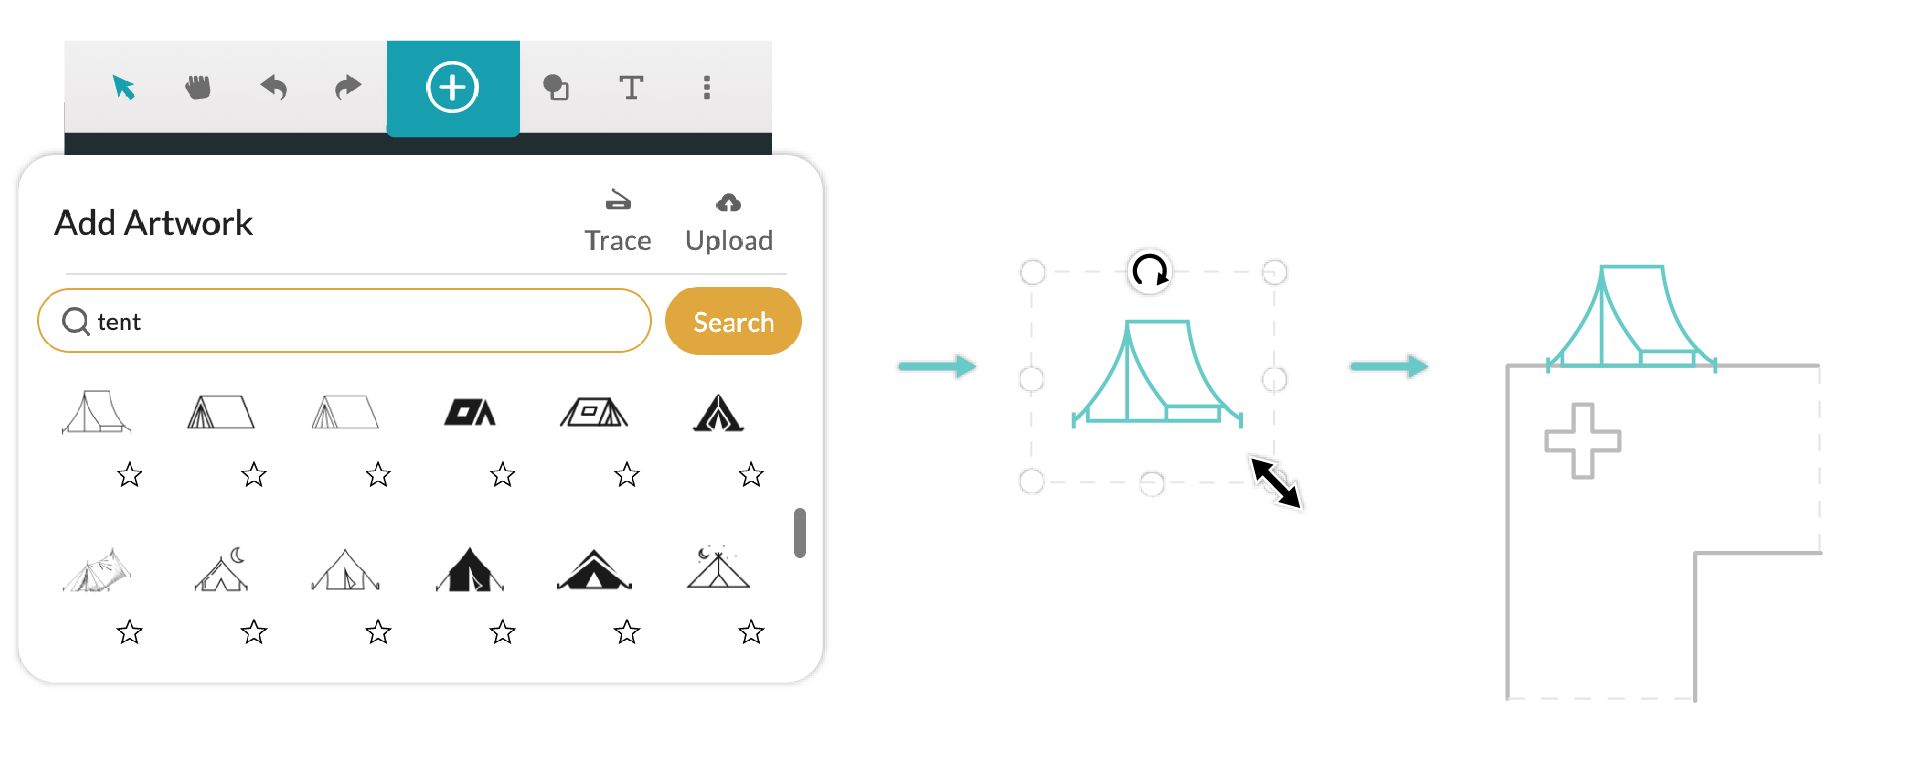
Now add some artwork to your design. For an endless supply of ideas, you can browse the featured artwork, search the 2 million+ images, upload your own designs, or trace hand-drawn artwork.
- For this project, on the top menu bar, click Import artwork.
- Search to find some art you like, or click one of the featured illustrations.
- Once the artwork appears in the workspace, click to select it. Resize or rotate your artwork however you’d like, then drag to align it to the top edge of the frame.
Tip: You can align this artwork however you want. It can be sitting on top of the frame or overlapping a bit. Later in the process, you’ll change and check some specific settings to make sure it prints the way you want.
Now you’re ready to add text.
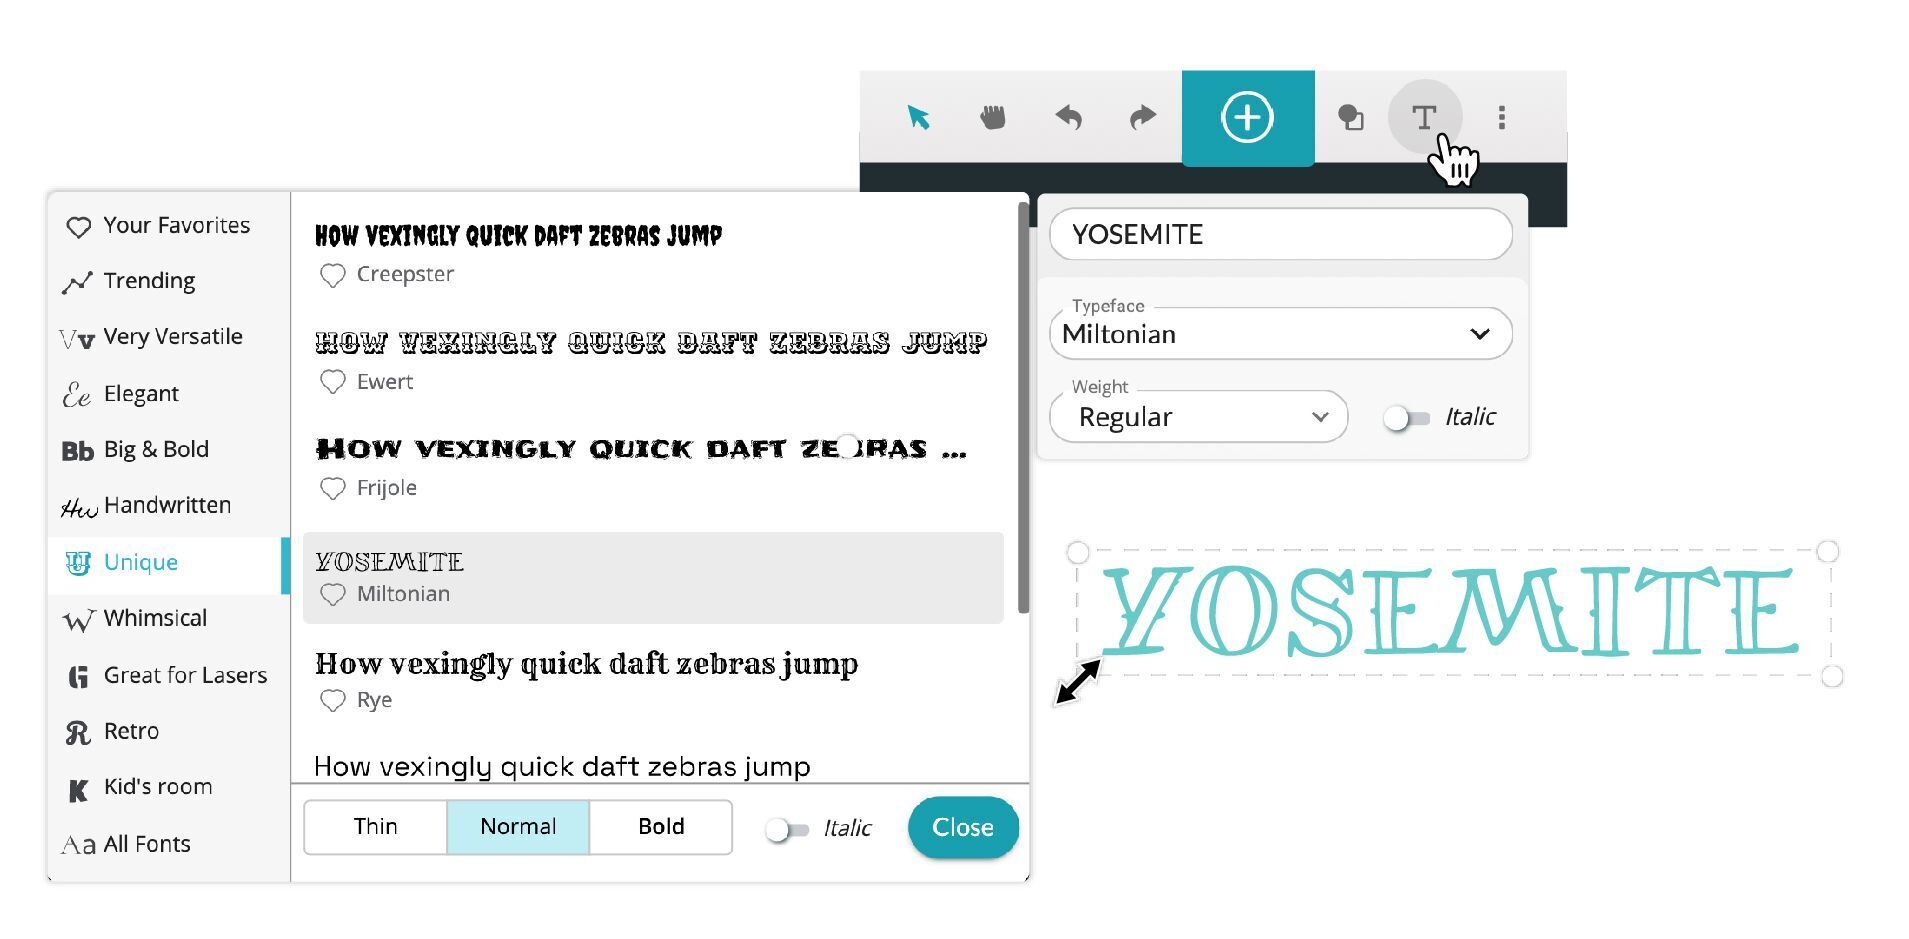
- On the top menu bar, click Insert text.
- In the text box, type the word or phrase that you want on your frame.
- Click the Font dropdown arrow, and then in the expanded font menu, choose what you want from all the options. For this project, we used the font Miltonian.
Tips: To find the perfect font, you can browse the options by style grouping, or click All Fonts, and then search. You can also preview bold or italic variations for your font by clicking the options at the bottom of the expanded font menu. - Resize or rotate your text the way you want it, and then align it next to your artwork at the top edge of the frame.
Note: Be sure to overlap your text and graphic elements slightly with the frame.
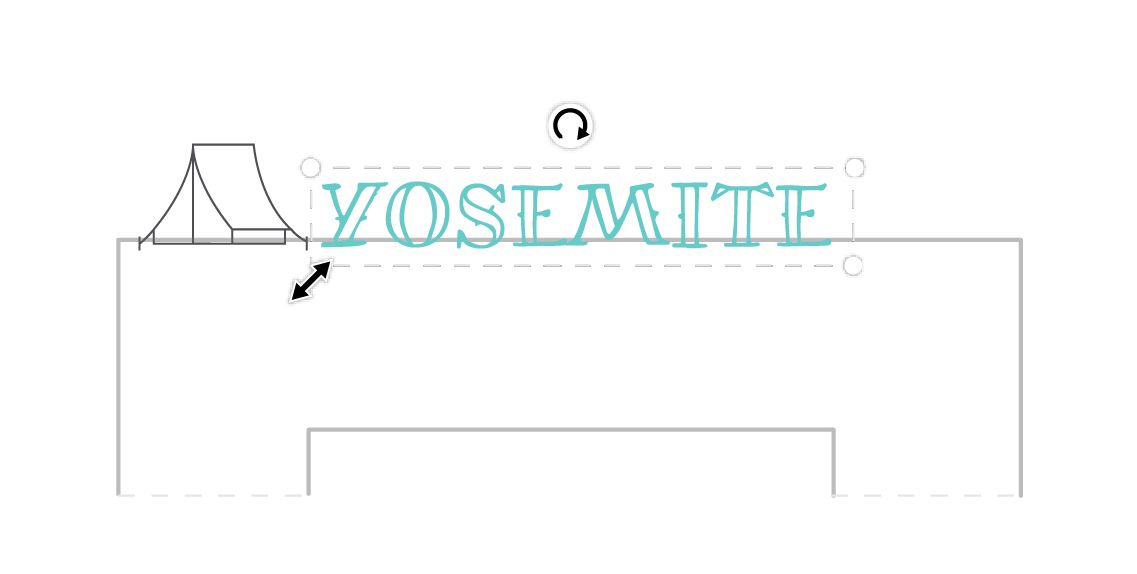 Connect your text and artwork to the frame
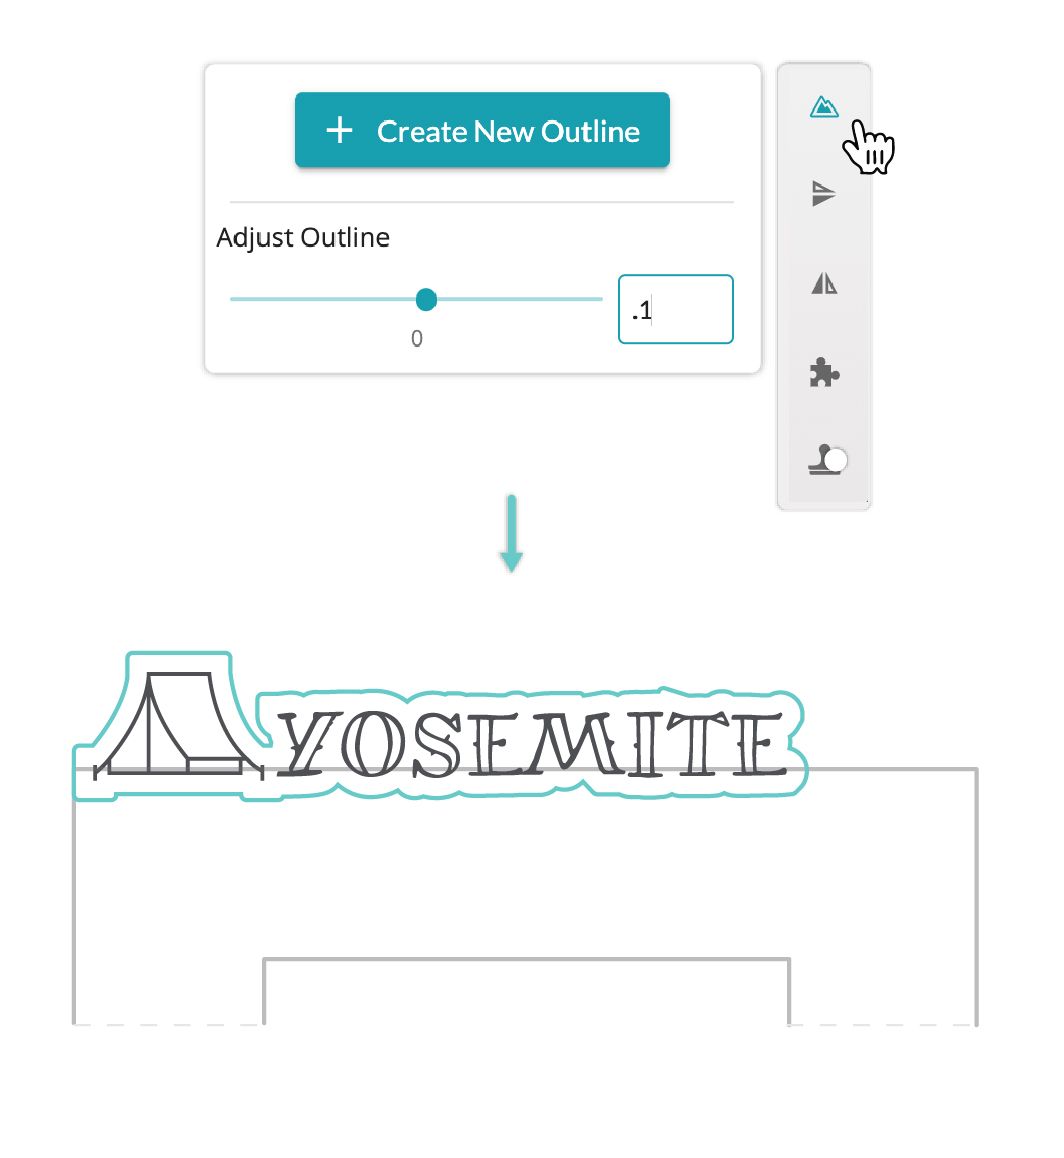
Now you’ll make a smooth connection of your artwork and text to the frame by using outlines.
- To create a selection box around all your art and text elements, click outside the design, and drag to include all the elements in the box.
- In the toolbar on the right, click Create outline.
- Click Create New Outline, and then adjust the outline to .1 in. You now have a new outline for the shape of your frame that includes your art and text.
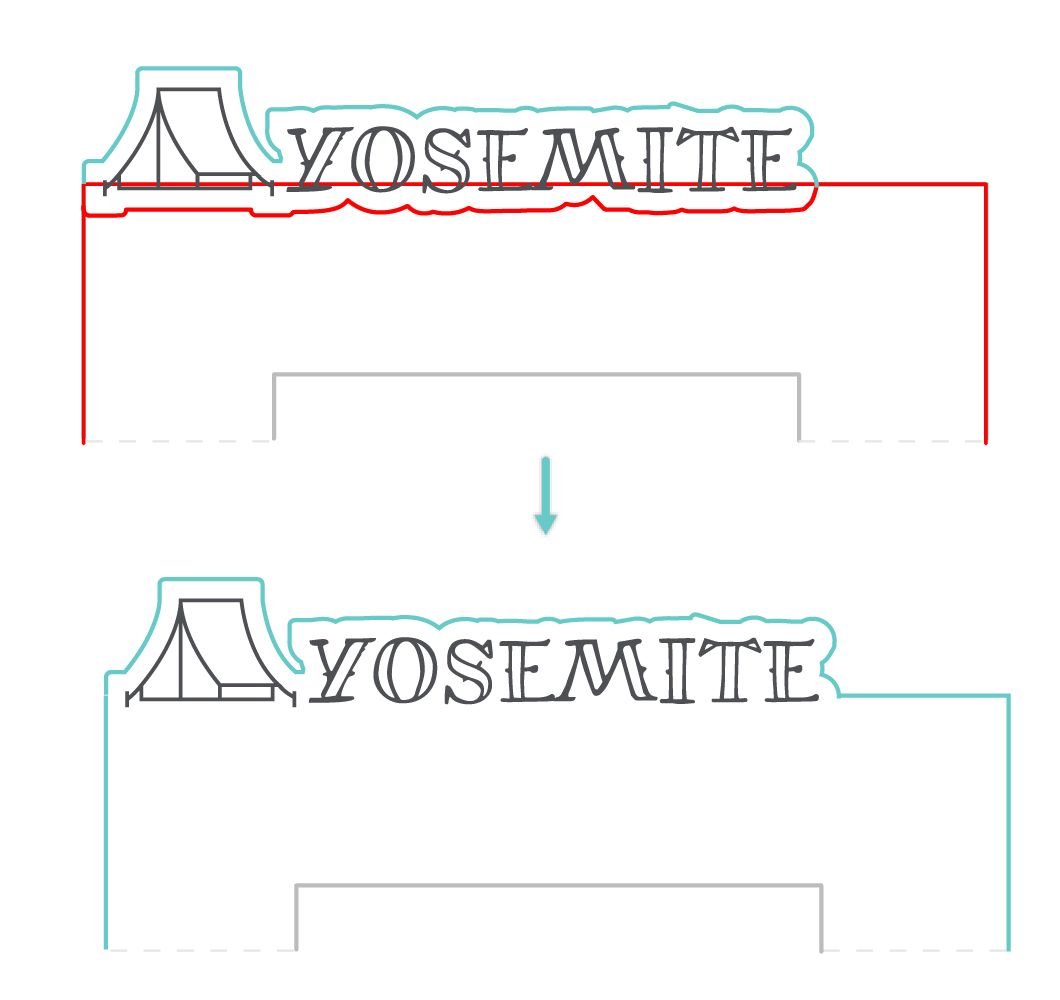
Now that the frame shape is ready, before you print, you’ll need to remove a few spare lines that are no longer relevant to the design.
- Click to select the original frame rectangle of the frame, and then press Delete on your keyboard.
Tip: If you happen to accidentally delete the wrong thing, you can easily undo your last action. Just press CTRL (or CMD on Mac) + Z.

Now create a back for the frame.
- On the top menu bar, click Insert shape, and then click Insert square.
- Once the square appears in your workspace, click the ruler button (Reposition and resize selected artwork) in the bottom left.
- To add the dimensions you want, first make sure that the Lock aspect ratio is turned off. Click the chain button to change this option.
- In the Scale text boxes, set the length to 6 in., and height to 8 in.
- If you want to add a nail-hole for hanging your photo on the wall, click Insert shape. Then click Insert circle.
- Click the ruler button and in the Scale text boxes, set the height and width to .35 in.
- Center your circle on the frame back near the top. Make sure the print step for the circle is set to Cut.
Finally, create a channel to hold the photo. You’re going to create three rectangles and join them to form a “U” shape.
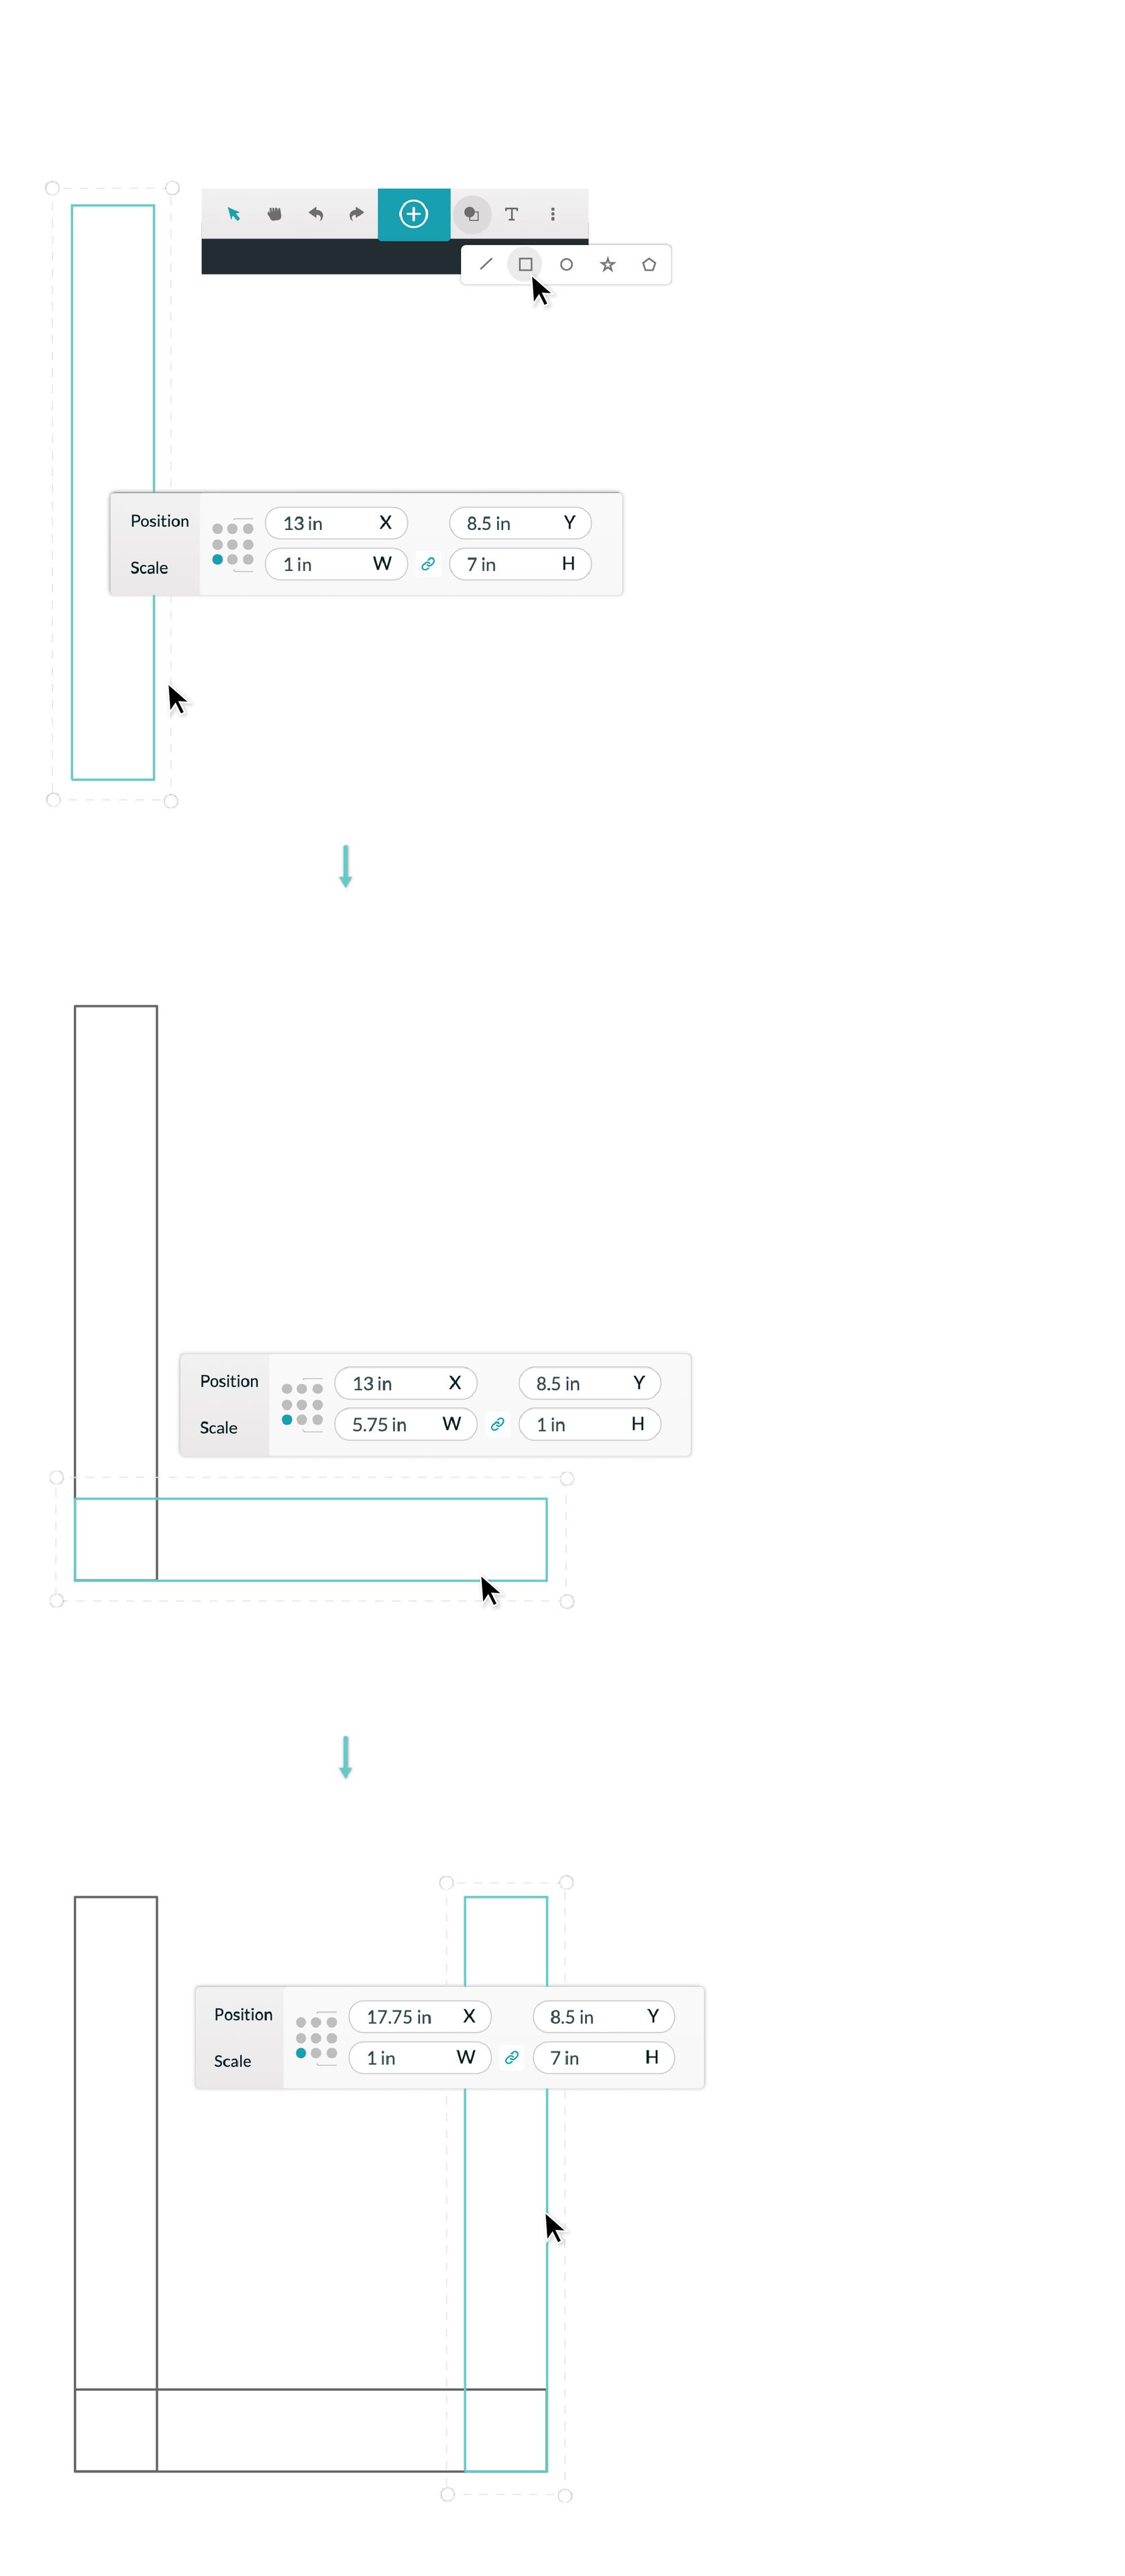
- Create a rectangle with a width of 1 in. and a height of 7 in.
- In the precision position tool, click the bottom-left alignment dot. This tells the App which corner of your artwork or shape to use for alignment.
- In the Position text boxes, set the X coordinate to 13 in and the Y coordinate to 8.5 in.
- Create another rectangle that’s 5.75 in. wide and 1 in. high.
- In the precision position tool, click the bottom left alignment dot.
- In the Position text boxes, set the X coordinate to 13 in, and the Y coordinate to 8.5 in.
- Create a final rectangle that’s 1 in. wide and 7 in high.
- In the precision position tool, click the bottom left alignment dot.
- In the Position text boxes, set the X coordinate to 17.75 in and the Y coordinate to 8.5 in.
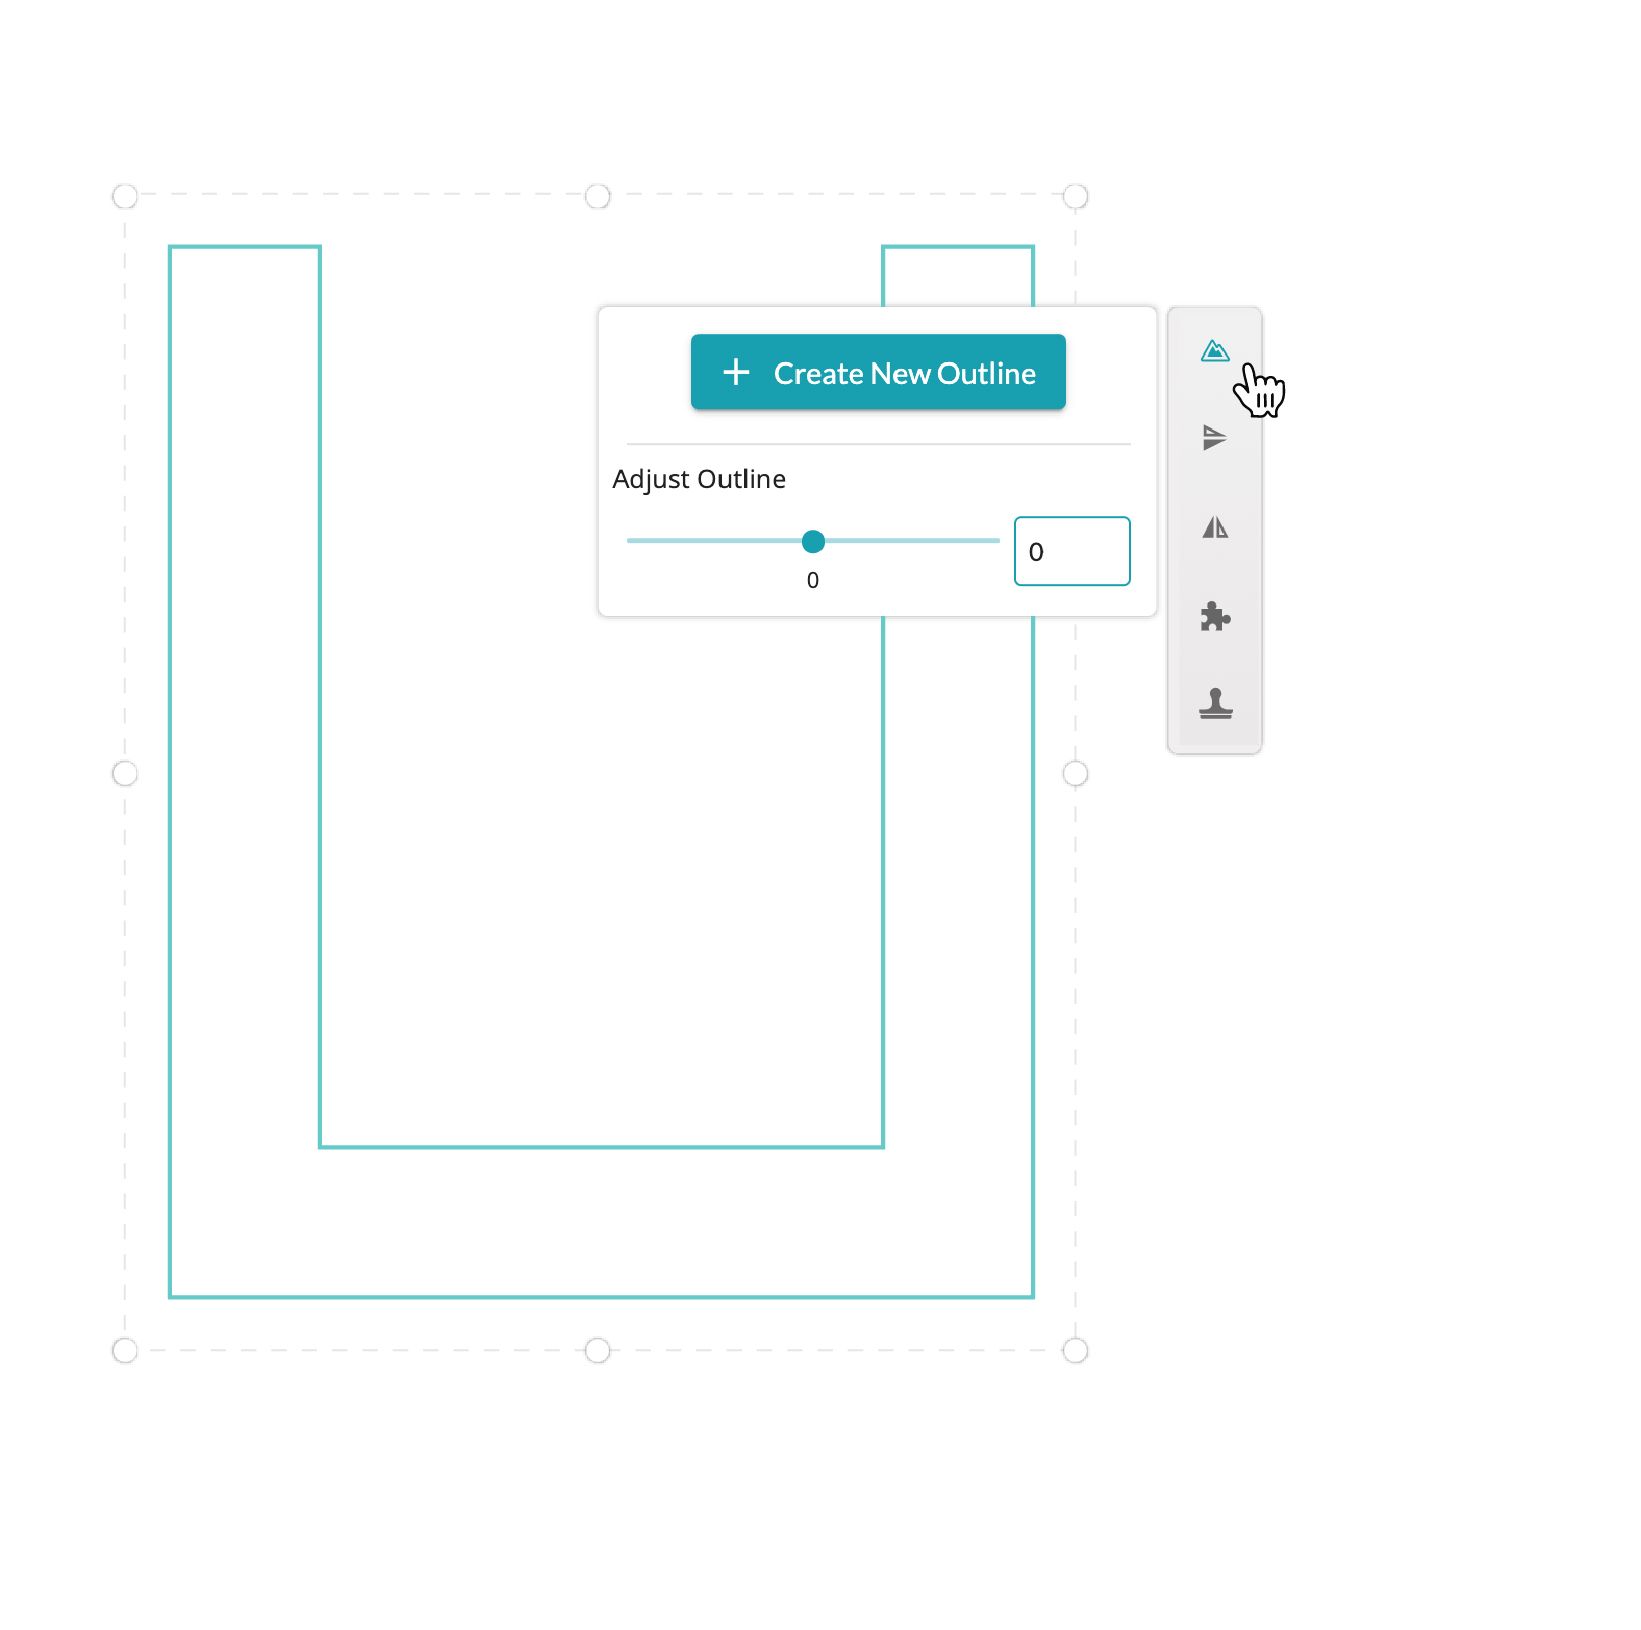
- Click and drag a selection box around all three rectangles.
- In the toolbar on the right, click Create outline, and then click Create New Outline.
- Set the outline to 0 in. This will join the shapes to the frame.
- Click on each of the original rectangles and delete each so that only the U-shaped outline remains.
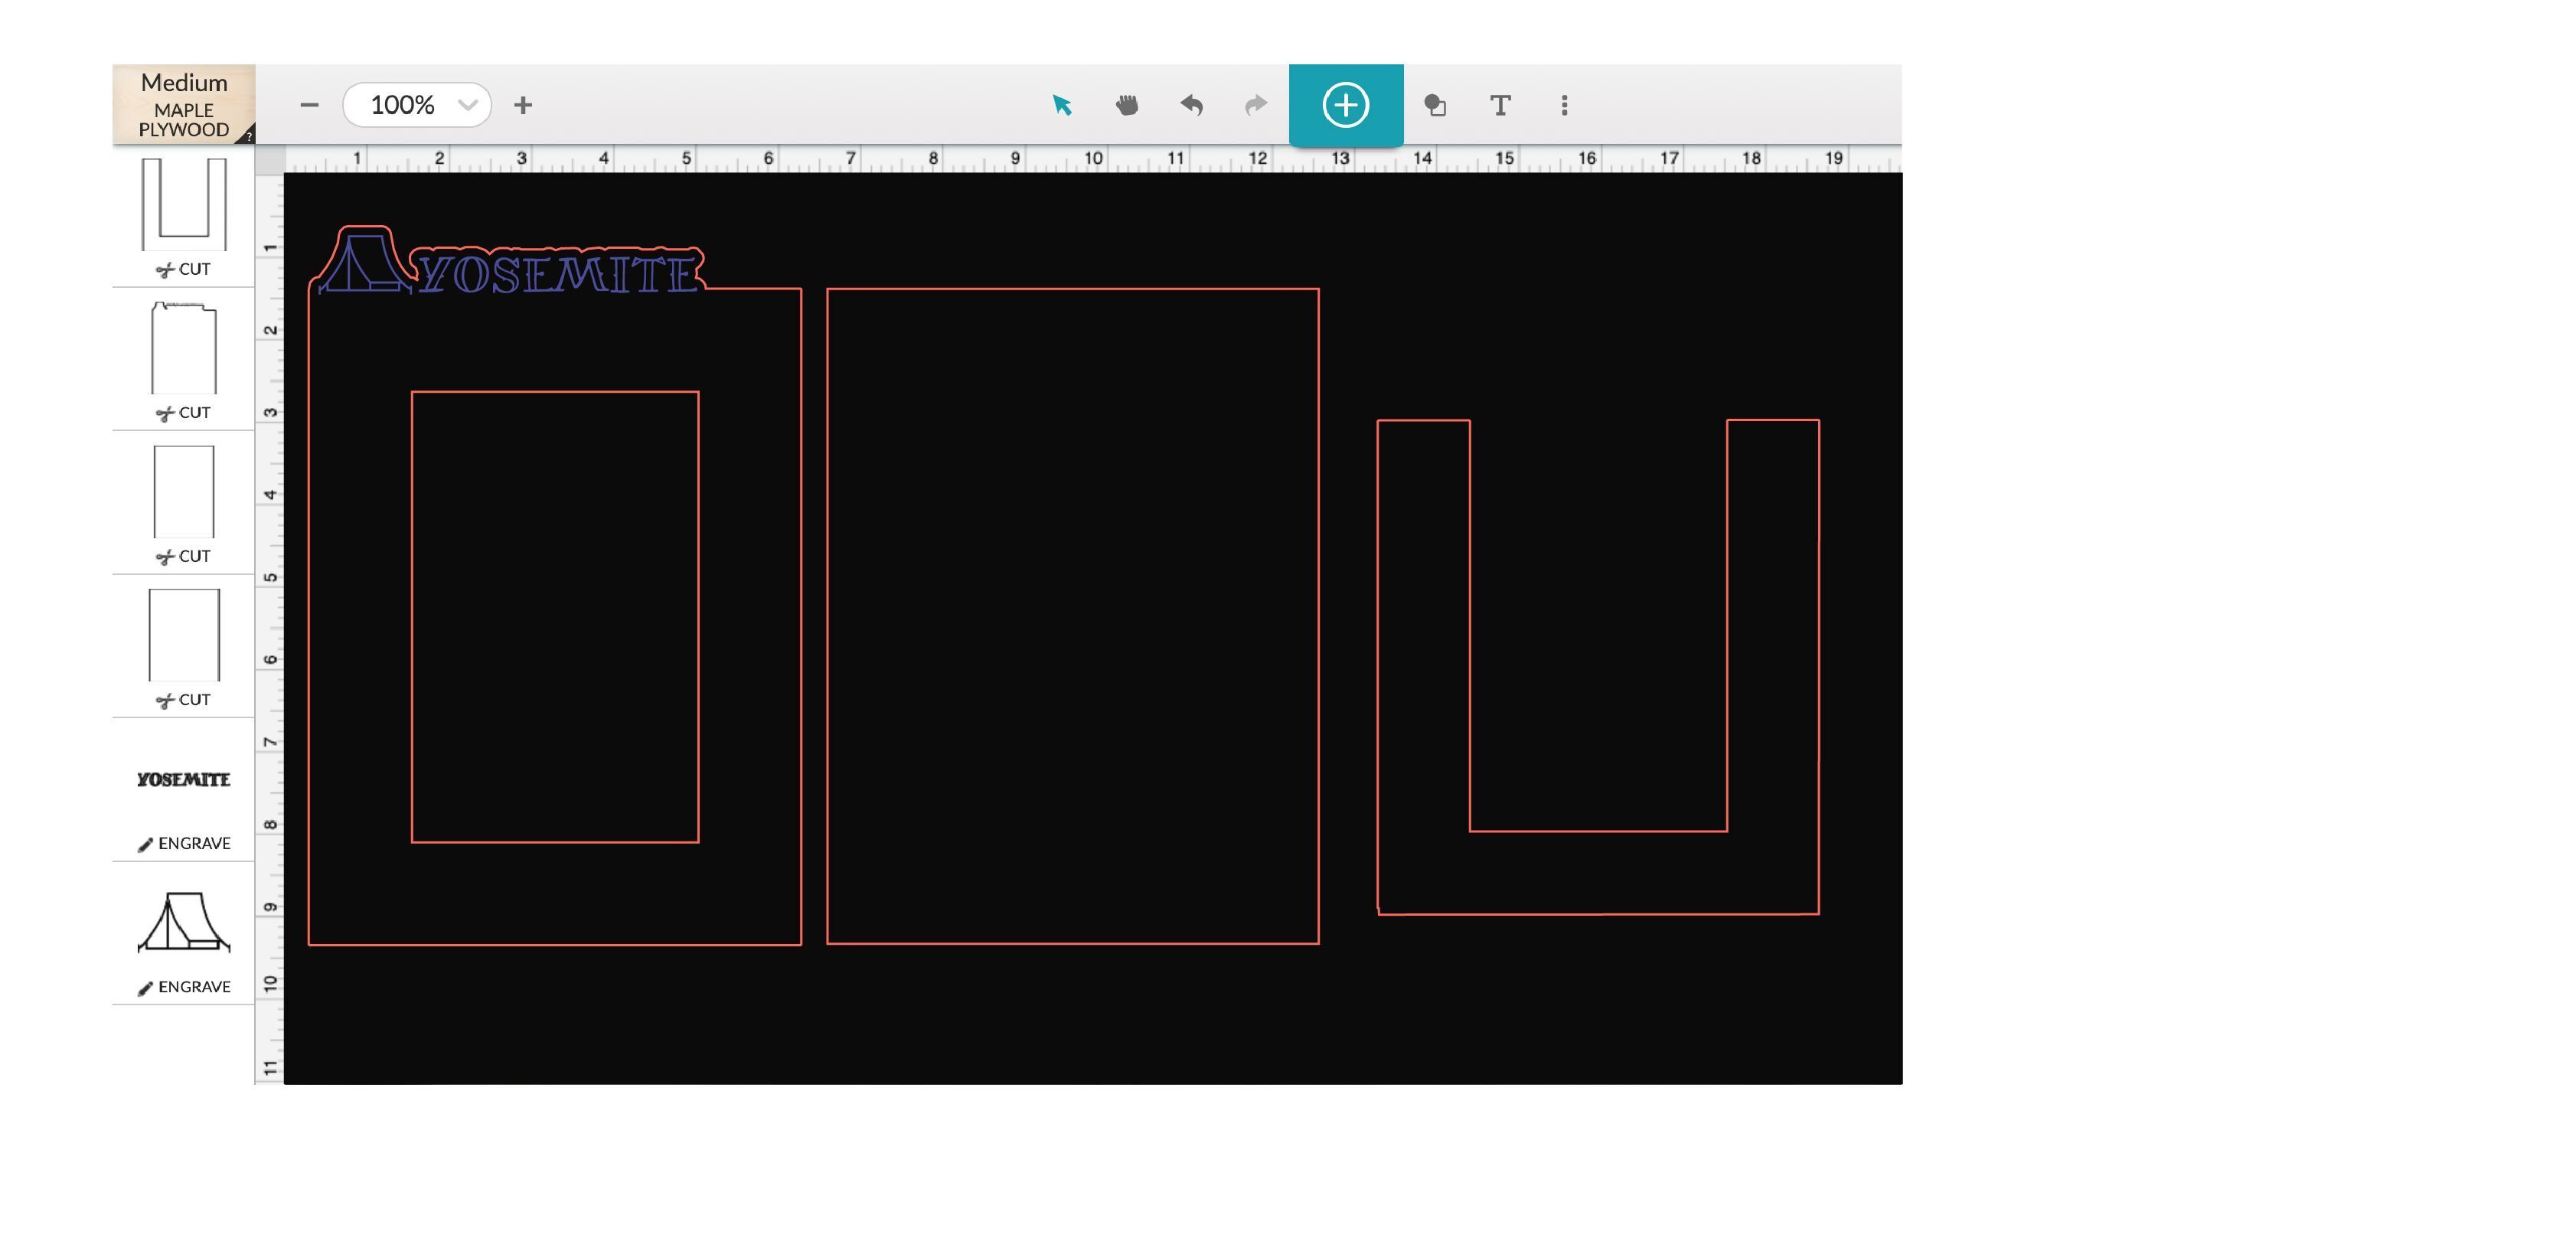
Finally, we'll make sure your Glowforge knows what to do with each of the shapes in your design.
- Place a piece of Proofgrade Medium Plywood in your printer bed. If your Glowforge does not automatically recognize the material from the QR code, (or you are using another material), click the materials menu in the upper left and select your material from the list.
- On the frame, make sure the outer edge and inner rectangle are set to Cut.
- Make sure that the steps for your text and artwork are set to Engrave.
- When everything looks good, it's time to print! Click the PRINT button in the upper right.
- Press the blinking white button on your Glowforge when you're ready to start your print.
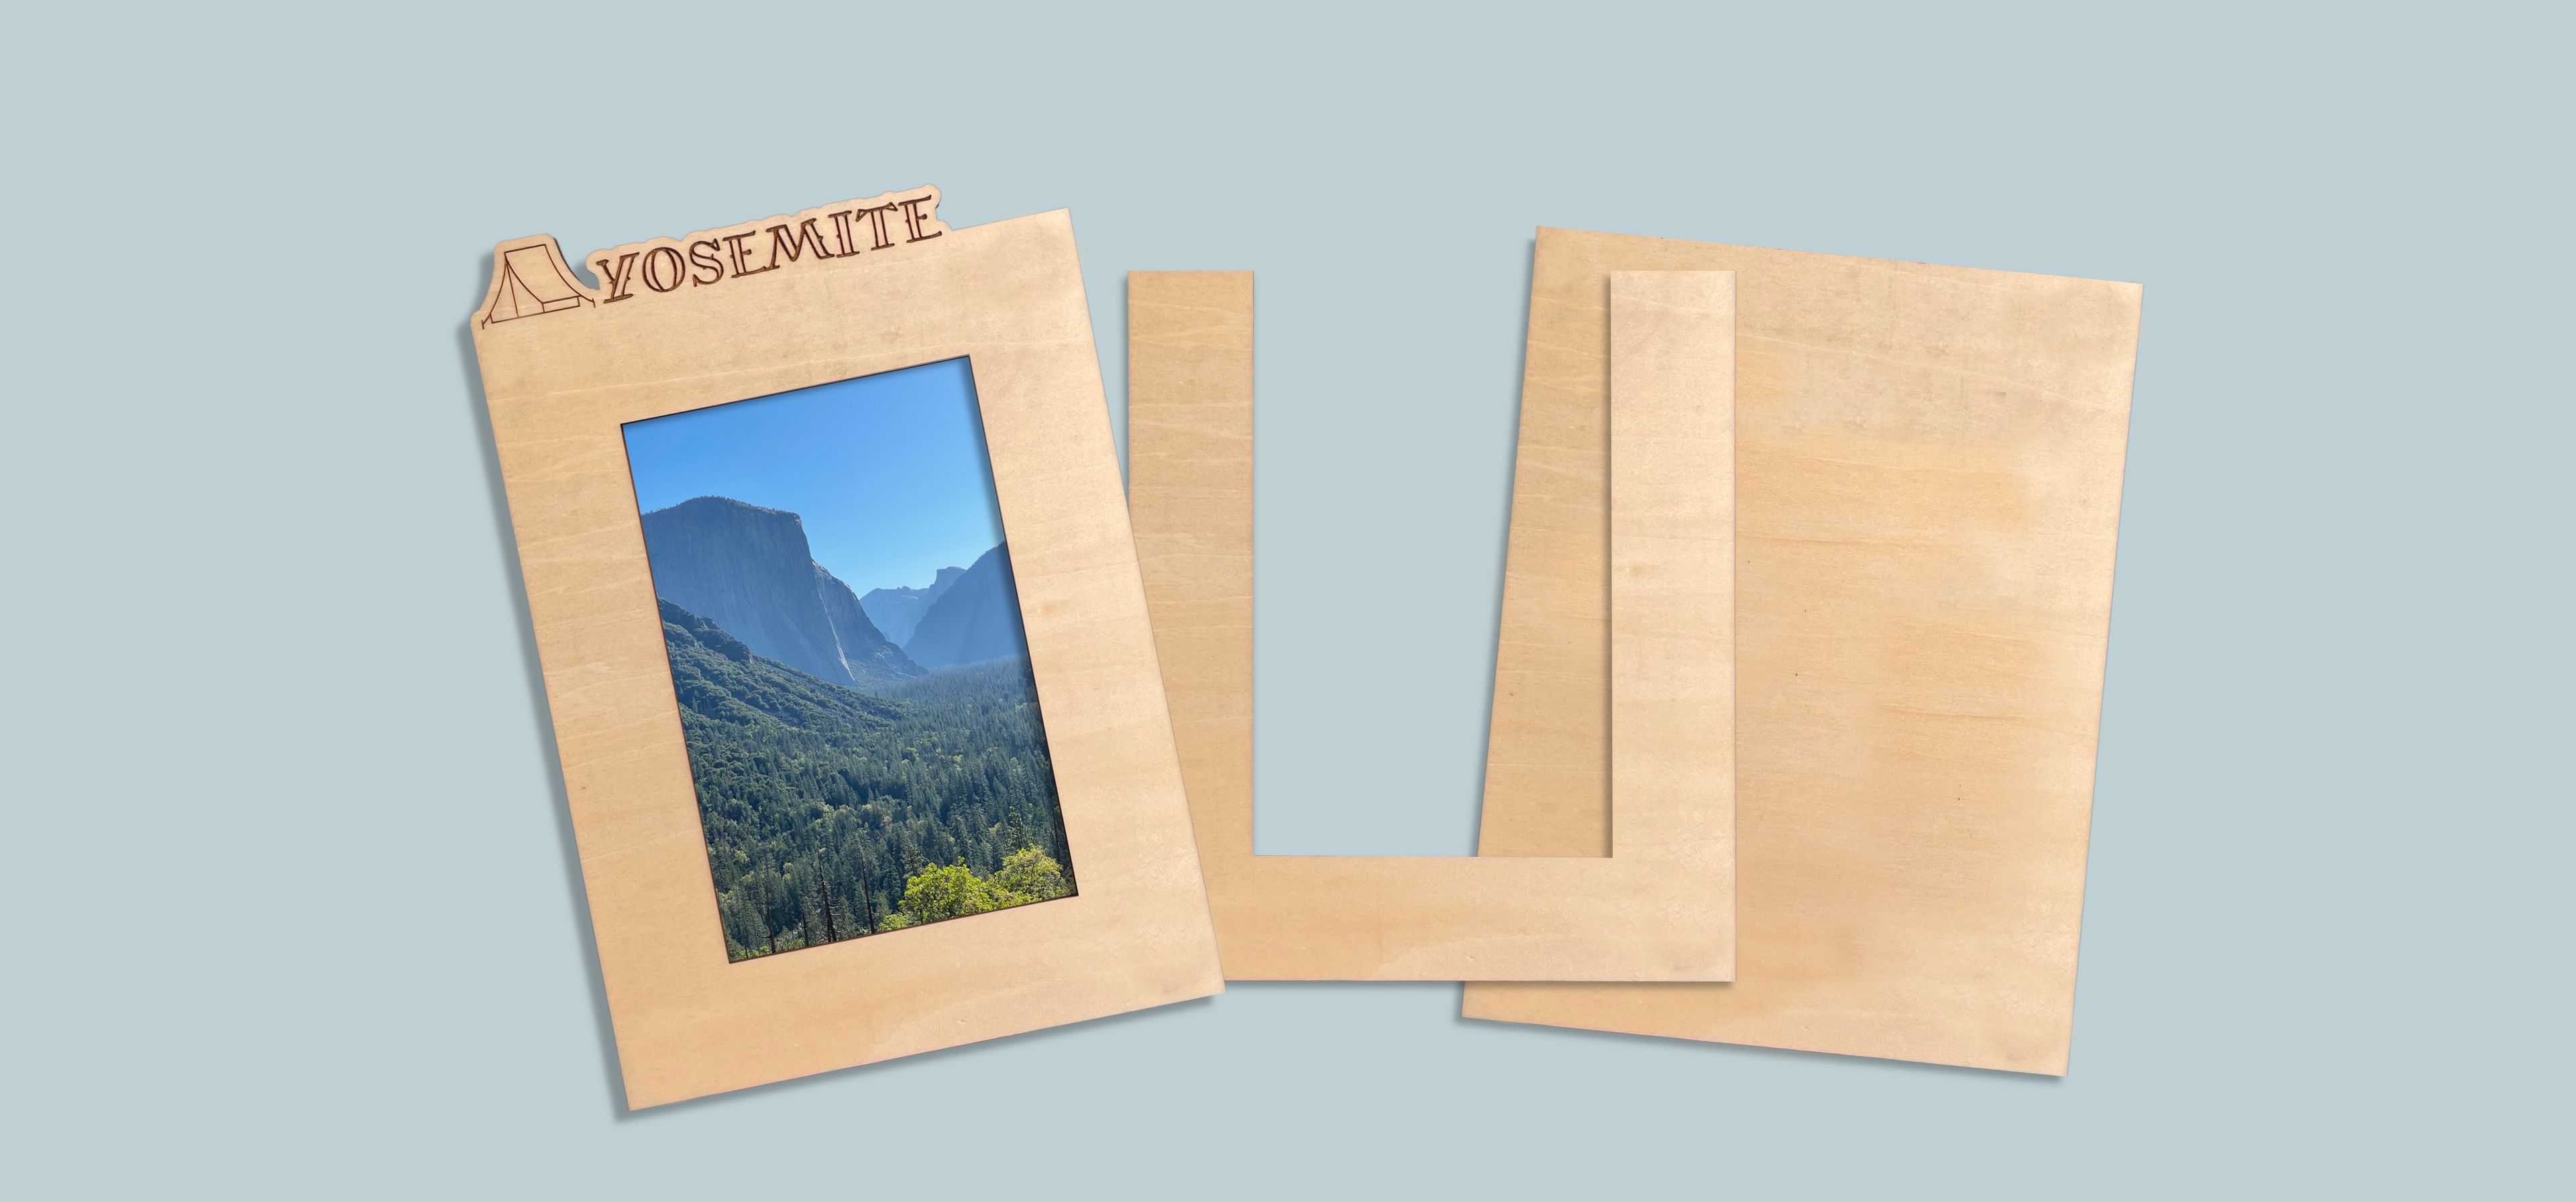
- Glue the U-shaped channel to the back of the decorative frame with the opening facing up.
- Glue the frame assembly to the solid frame back.
- Slide your photo through the opening.
- Hang your frame from the wall, or consider printing the Elegant Artstand for a tabletop display.
Enjoy your frame and photo, and get ready to hear “I want one too!” from friends and family.
See also
Learn more about Glowforge Premium.