Pro Passthrough software makes it easy to print really big designs that wouldn't otherwise fit in the 11” (27.9 cm) x 19.5" (49.5 cm) workspace. The Pro Passthrough slot in the front and back allow for materials that are 20” (50.8 cm) wide, up to ¼” (0.6 cm) thick, and as long as you want.
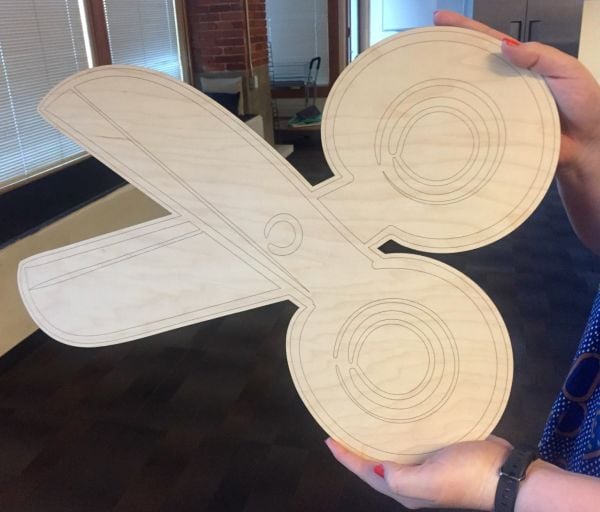
That means you can create huge, dramatic products like furniture or giant scissors!
Set up the print
This tutorial will show you how to correctly set up your Pro Passthrough print.
-
Prepare the Design
Your design should not be wider than the bed (19.5” or 49.5 cm), but it can be infinitely long! You don’t have to split the design into smaller pieces.
- Check that your material is longer than your design.
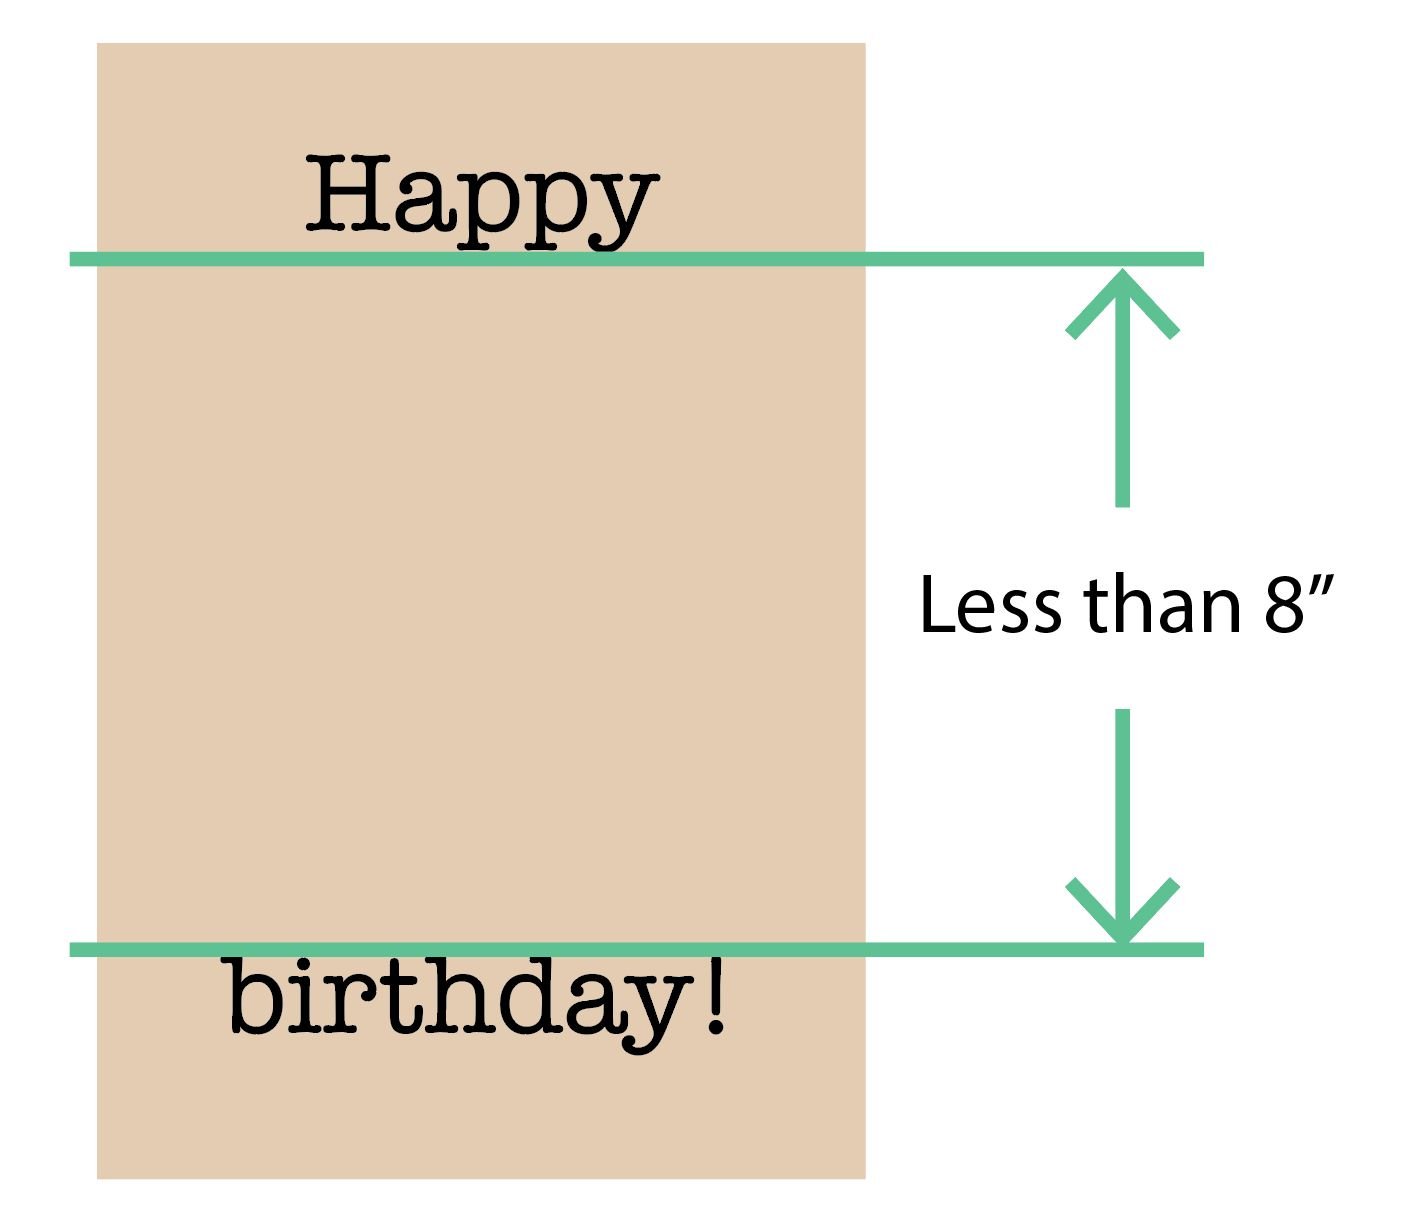
- Make sure your design doesn’t have a vertical space with no art taller than 8” (20.2 cm). If it does, the camera will lose track during the print.
-
Load your material
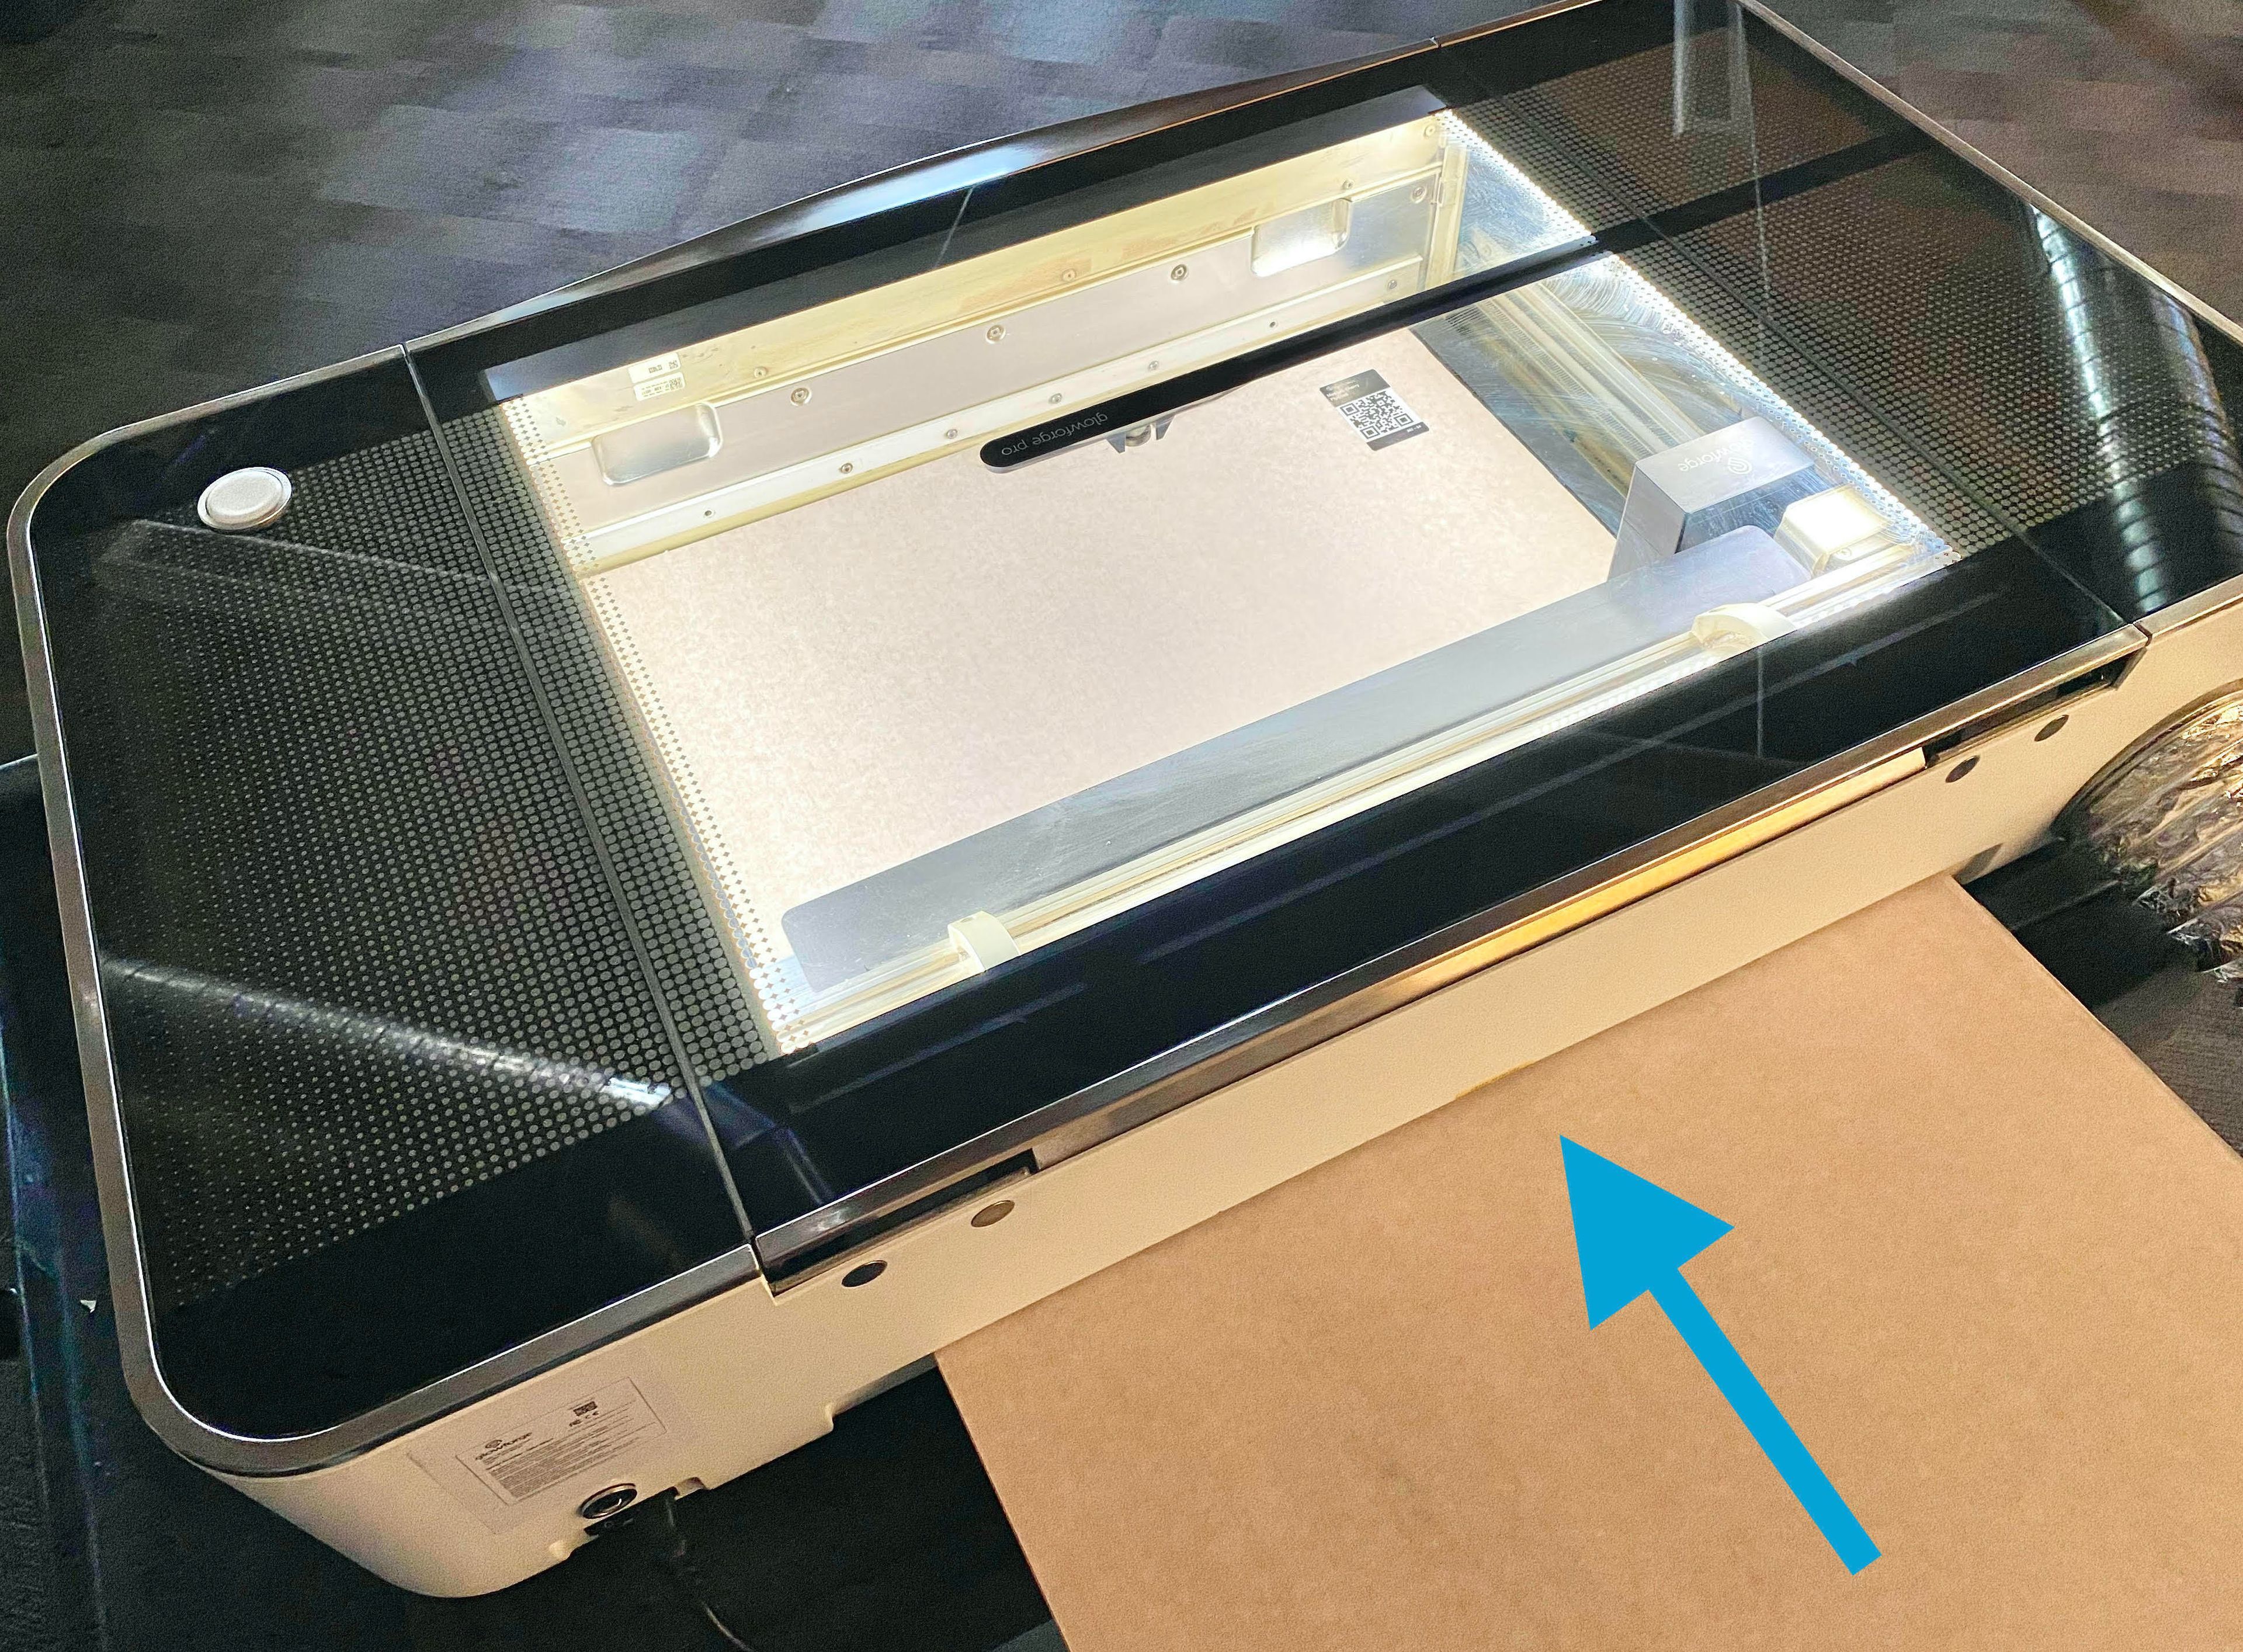
Load your Proofgrade® material from the back of your printer toward the front.- Follow these instructions to remove your Pro Shields.
- For most prints, slide the material until the bottom edge is touching the front of your printer. Excess material should extend past the back of your printer.
- For thin material, it can help to slide in a piece of thicker material like hardwood first, then put your material on top, and then take the hardwood out.
- A long piece of material can sometimes get tilted up or down, so use a stand to hold the material in place. Make sure the stand is secure, and be careful not to bump into it.
- Load your material straight at the start, or else your design might eventually veer off the edge.
-
Turn on Pro Passthrough
- Click the three-dot More menu, and then turn on the Pro Passthrough option.
- If you don't see the toggle, or if you've recently installed a new print head, run Printer Head Setup and then return to this step.

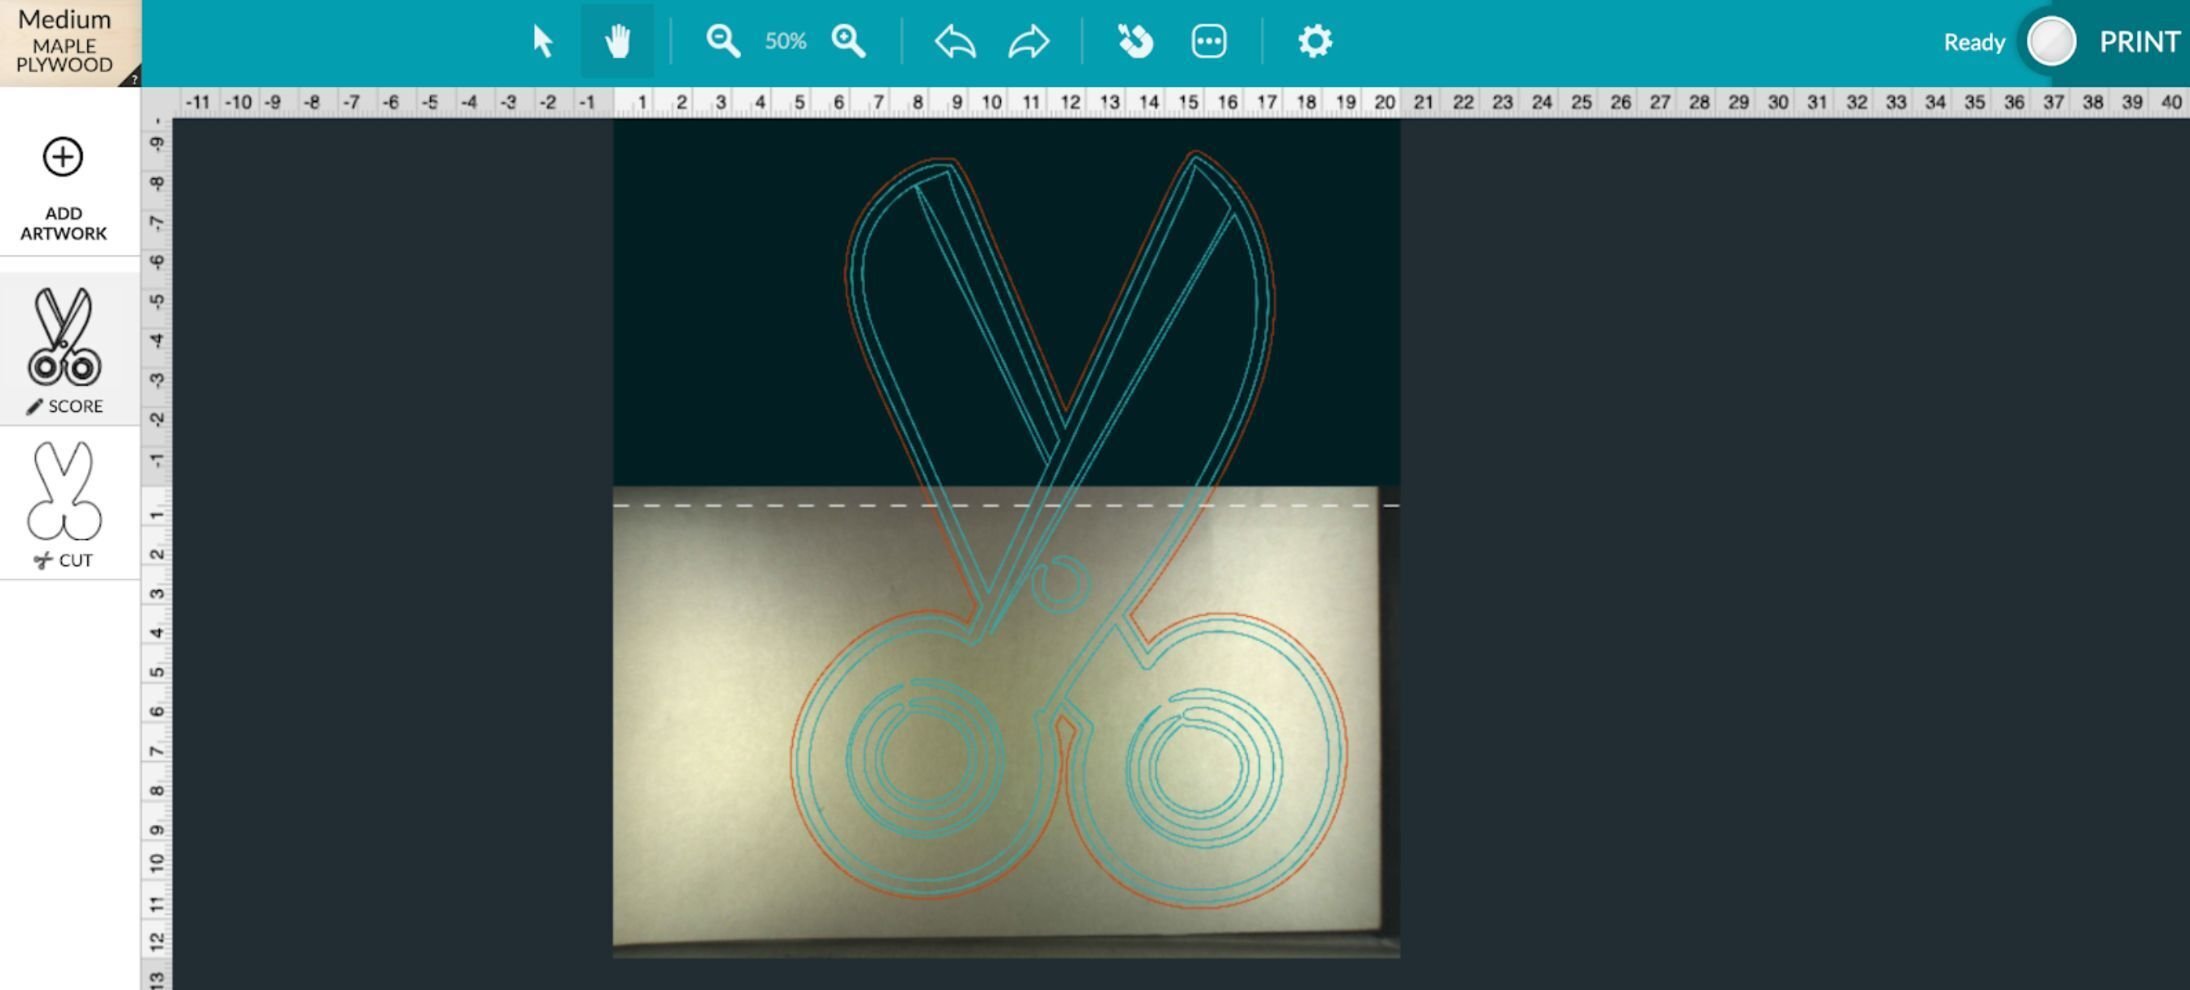
Once you've selected Pro Passthrough, you’ll see a zoomed-out image of the bed with a dashed line.
-
Line up your design
- Get a new bed image by opening and closing the lid or selecting Refresh bed image under the gear menu. Move your design into place.
- Since Pro Passthrough works from the bottom of the design to the top, align the bottom portion of your design along the bottom edge of the material (close to the front of your Glowforge).
- Make sure the design does not hang off the left, right, or bottom margins.
- Add, move, and resize artwork as you wish.
- Note: The dashed line is the cutoff for the first print - anything above the dashed line will not be included in the first print. The black area above the dashed line illustrates the extension of your material.
-
Enter step settings
Choose your material and select the step settings. You won’t be able to edit these once the print starts.
Once the print is set up and ready to go, follow the steps below.
-
Start the print
Press the glowing white button like you would for any other print.
-
Wait for instructions
When the print is done, don’t immediately lift the lid or move your material! Wait until you receive instructions in the app sidebar, which should take about a minute. Tip: Don’t lift the lid or move your material while the button on your printer is glowing.
Here are some tips to supplement the instructions in the app.
-
Shift your material
When prompted, slide the material toward the front of your printer so that there are at least 3 in (7.6 cm) of the previous print still on the bed. You can lift the lid during this step.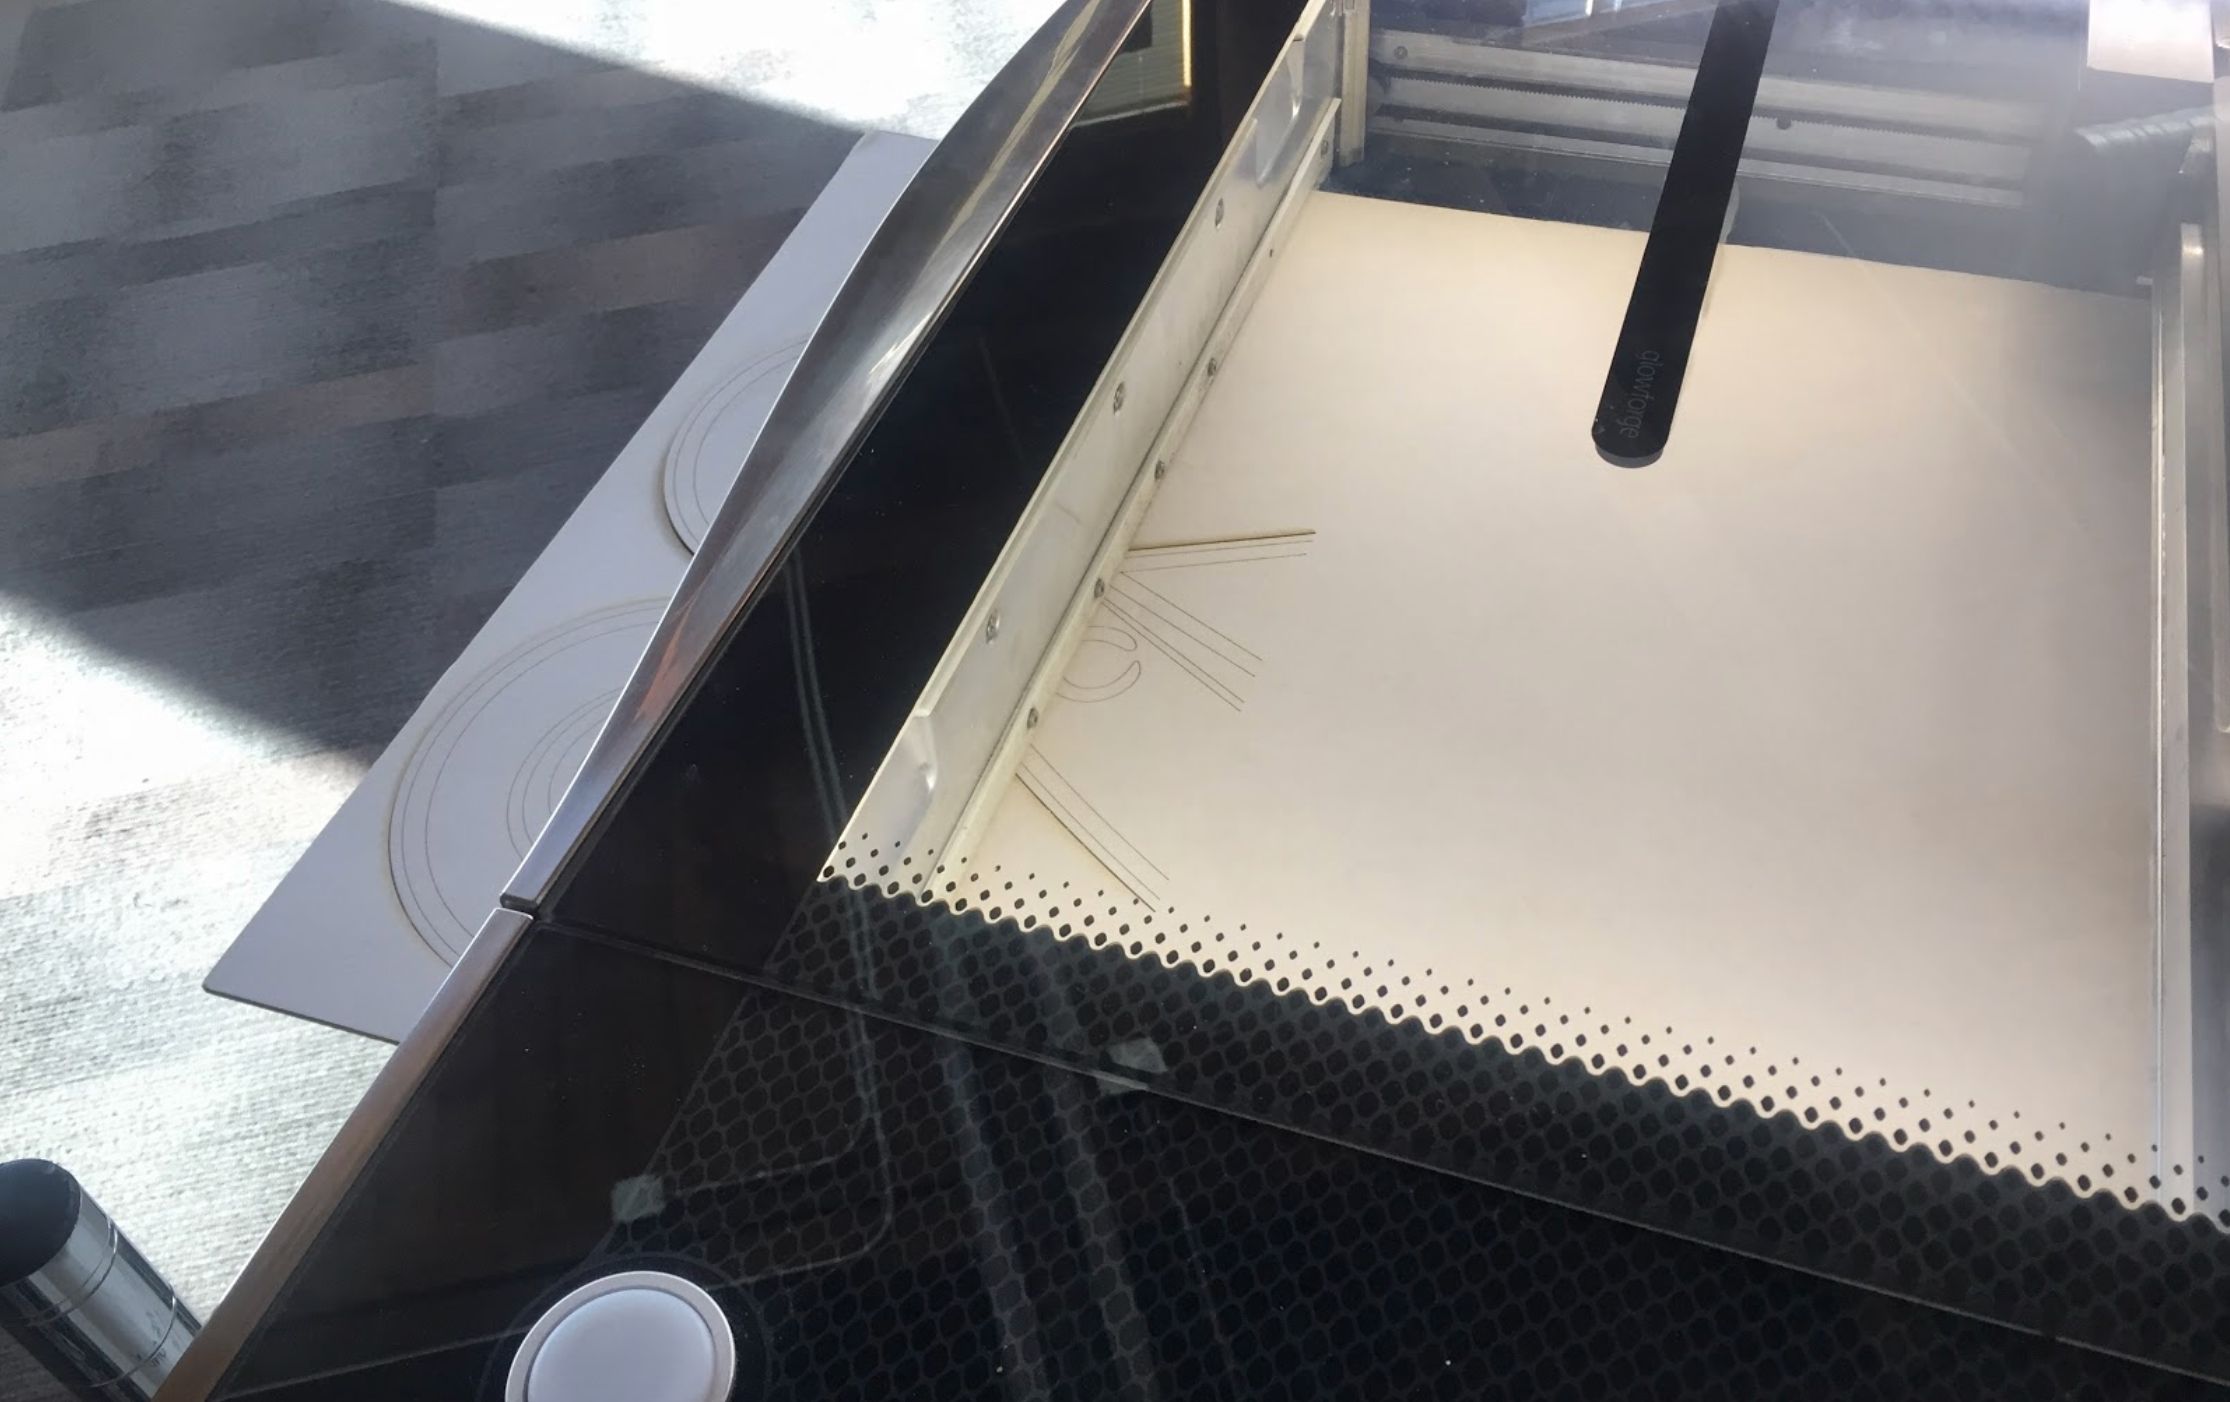
-
Press continue
Once you press continue, the design will be automatically aligned, which may take up to 5 minutes. -
Review the alignment
If the app indicates that alignment has succeeded and it looks lined up to you, press continue to start the next print.
If the alignment looks incorrect or is unsuccessful, follow the tips in the app. If the cameras can’t identify the new position of your material, you’ll be prompted to retry alignment. Before retrying, move your material against the left side of the tray and shift it an inch away from the front door, toward the back slot. Improving lighting may also help. You can lift the lid for better access. -
Align manually if necessary
If you've tried multiple times and alignment doesn't succeed or looks inaccurate, try to Align Manually. This lets you drag and drop your design into place.
When you choose to align manually, a new design called “Pro Passthrough Remainder," opens, containing the remaining unprinted portion of the design. After you choose Align Manually:-
- Turn the Passthrough toggle back on.
- Reset the material and step settings if they have changed.
- If you’d like, lift the lid and reposition your material.
- Use Set Focus by clicking the gear, selecting “Set Focus”, and then clicking on the material in the place where you plan to print.
- Line up your design.
- Press Print.
- Continue as usual with your Pro Passthrough print.
-
Repeat this process by following the instructions in the Glowforge App until the full design has been printed. When the print is done, the Pro Passthrough toggle will turn off.
- Don’t lift the lid between printing sections except when prompted on the screen.
- Don’t move (or bump into) your material except when the software instructs you to pull it through, or before retrying alignment.
- Move material through the flaps carefully to avoid damage to the flap. Cover any wide holes with a sturdy, thin material like cardstock before moving your material through the slot.
- When exporting from design software, make sure that your design fully fits on the workspace or artboard. Anything sitting off the artboard might not be exported, meaning it won’t print.
- We suggest using vector engraving, or a raster image with a high-resolution bitmap and an HD setting. Low-resolution bitmaps can appear to have skipped lines between printed sections.
- To help alignment succeed, keep cut-out pieces in place when moving your material. Remove them once they are no longer inside the bed.
- If the print is interrupted, either from unexpected errors or lifting the lid while your printer is busy, you will not be able to continue printing that section. If the print was able to finish, you can continue by aligning manually.
- If you aren’t getting good results from aligning manually, we suggest using the Camera Recalibrator.
- If your browser closes during a Passthrough print, re-open the design and click Print to resume.
- If you wish to run a print on another printer or set up another design while your Pro Passthrough print is in progress, open the app in another tab.
- If needed, or instructed by a member of the support team, run printer head setup.
If you run into trouble while working through these steps, or have questions along the way, please contact our team and we'll be happy to help!