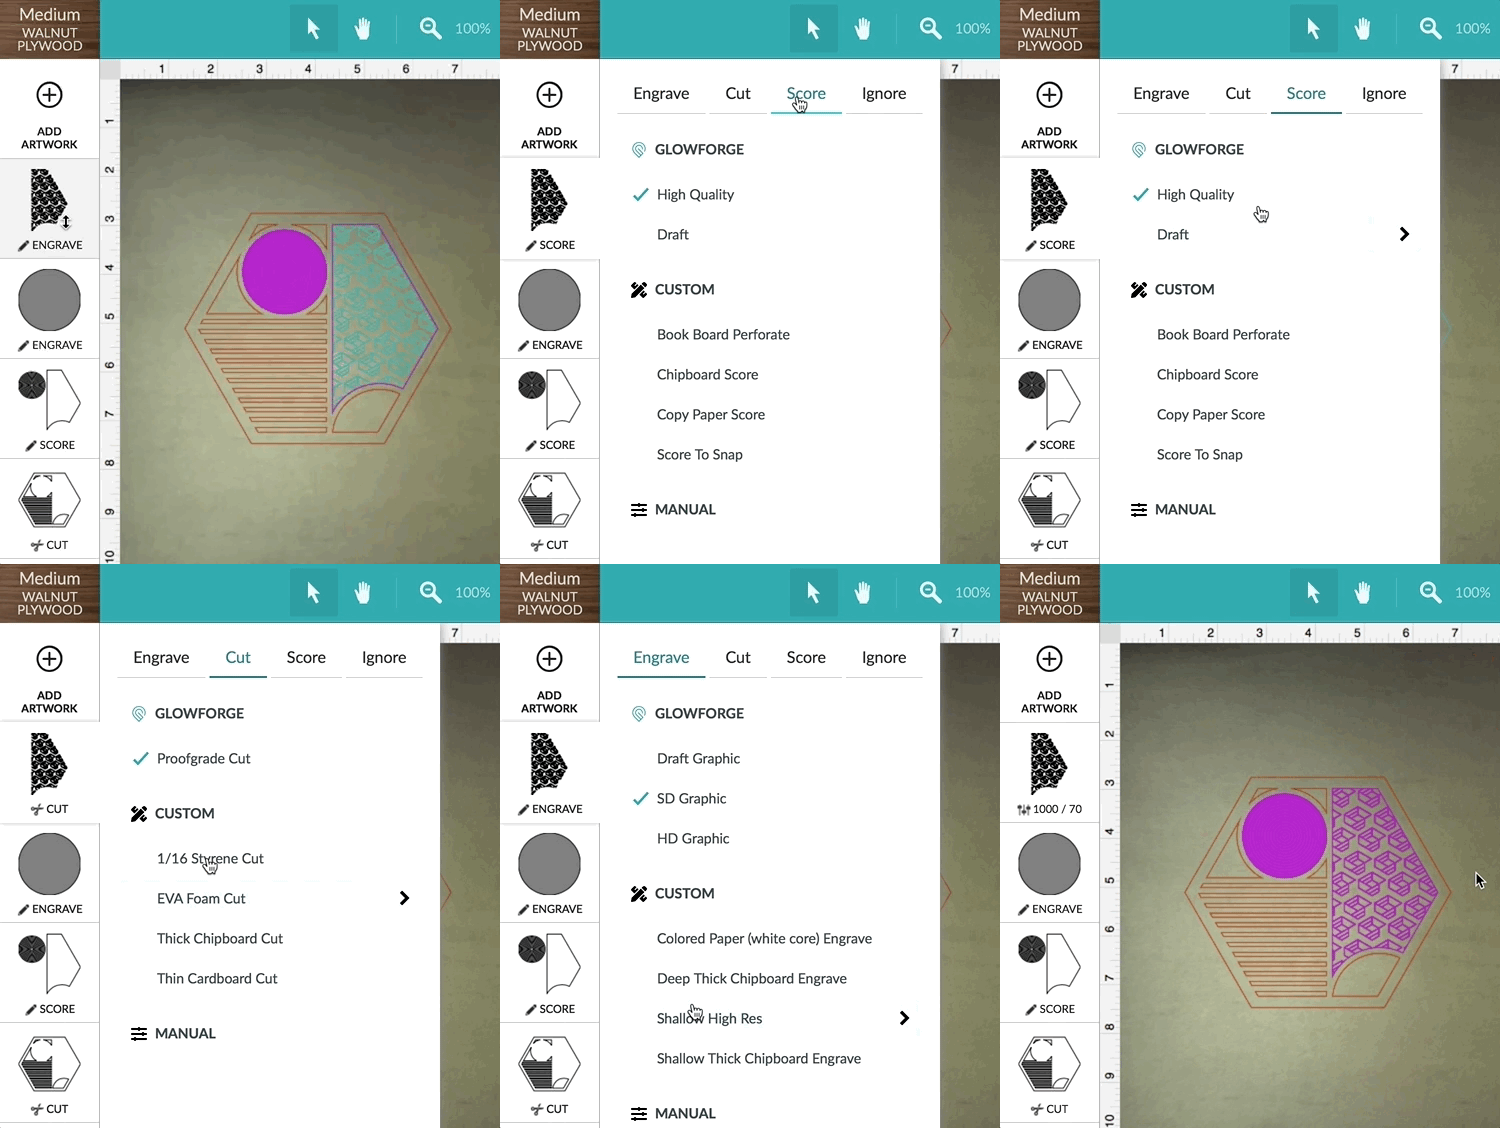
Working With Manual Mode
Manual mode gives you a greater degree of control over the settings on your Glowforge. Using it successfully can give you precise control over the speed of a print, the depth of an engrave, the level of detail, and sometimes even the colors produced.
That said, manual mode can get complicated. Creating a new setting from scratch might mean defining up to eight (8) different parameters. You can also choose a material in the App and modify the settings for your specific need. Either way, be ready to experiment, and be sure to check the community forum for tips and tricks.
Take special caution when working in manual mode. Using custom settings increases the risk of fire or damage to your Glowforge. Follow all instructions in the Glowforge user manual carefully and never print with your laser unattended.
You can use manual settings with Proofgrade® materials for custom effects, or with your own materials. If you're trying a new material, run a small test print first, at minimum power. Gradually increase the power until you get the desired result. Some materials can behave unpredictably, and it’s important to proceed with caution.
Below we've provided a description of the parameters, what they do, and how they affect your print results.
Legend
Three symbols offer a quick visual reference for each parameter's effects. "Print speed" refers to how quickly your print will complete; "engrave depth" refers to the depth of your engraves and scores; and "print resolution" refers to the level of detail achievable. Keep these in mind as you read further.

Power
Power controls the maximum amount of energy used by the laser while printing.

- How does this affect my print?
Higher power produces deeper engraves, cuts, and scores, but also produces less-detailed engraves, as the laser can damage the surrounding area. - Precision Vs Full Power The laser tube produces varying amounts of power. This setting offers two types of power control, balancing efficient cutting with high-quality prints. Consider which setting better fits your situation:
- Precision power, as the name suggests, is precise and consistent. It does not use the full power of the laser. It’s ideal for cutting and engraving delicate materials such as paper, or when you want a very detailed print.
- Full power uses the full power of the laser, while sacrificing some consistency. It's best used for cutting through a material, rather than engraving or scoring to a consistent depth.
Speed controls the maximum speed the laser head moves around the printing area.

How does this affect my print?
- Increasing speed decreases your overall print time, as the laser head moves more quickly.
- Increasing speed decreases the depth of engraves, cuts, and scores, as the laser has less time to impart laser energy into your material.
- Increasing speed reduces print quality. In the case of an engrave, the laser has less time to make an accurately positioned mark on your material. In the case of a cut or score, too much speed can result in the laser head jerking when changing direction, causing jagged lines and bumps in your print.
- Too much speed when cutting and scoring can also result in dark corners when the laser head changes direction, imparting too much energy for the material.
Engrave resolution, or lines per inch, controls how many horizontal passes the laser head makes when engraving a design.

How does this affect my print?
- As the diameter of the laser spot doesn’t change unless modified using Focus Height, there are only so many spots that can fit into an inch of vertical space before there are gaps between them, or they start to overlap.
- Using low Lines Per Inch (LPI) can results in stripes in an engrave, or jagged edges when engraving curved objects, as the laser spot barely, or doesn’t overlap.
- High LPI causes the laser spots to overlap, smoothing the appearance of engraved shapes.
- Using high LPI also causes engraves to be deeper. This is caused by the laser passing over the same spot more than once, and removing material each time.
Minimize Margin (Beta)
Minimize Margin works for bitmap engraves only. When it is set to anything other than “Maximize Quality”, the engraving begins while the head is still getting up to speed.

How does this affect my print?
- The margins are the grey no-go zones on the left and right the head uses to travel up to speed. You can now opt to have your Glowforge start engraving while the head is still getting up to speed in the margin, and the software will automatically compensate by lowering the power.
- By default, the option is set to “Maximize quality”. By changing it to minimize margin, the on-screen grey zone will shrink allowing for a larger printable area.
- This can make your engraves much faster, especially at high head speeds! Because accelerating takes a while, engraving in the margins can drastically decrease the time it takes to print.
- This feature is in Beta. It only works for bitmap engraves, not vector engraves. The edges of your engraving may look a little blurry or ragged at high speed and minimal margin.
The number of passes controls how many time the laser repeats the entire engrave step.

How does this affect my print?
- When engraving, using more than one pass has a similar effect to using high LPI, and causes a deeper engrave. For intentionally deep and 3D engraves this is perfect, but in most cases, a single pass is all that’s needed.
- When cutting, multiple passes may be needed to cut through thick non-Proofgrade material. The number of passes option makes this easy, and prevents having to run the print twice.
Focus height can override the autofocus result, changing the size of the laser spot and how efficiently it can mark the material. For the highest levels of detail and most efficient cutting, the focus height should not be changed.
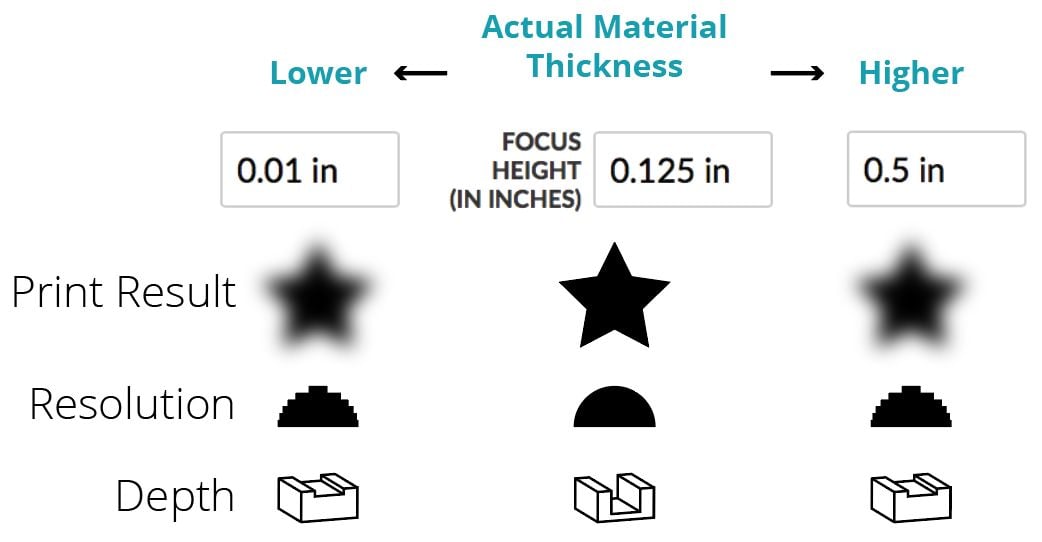
How does this affect my print?
- Changing the Focus Height is the same as switching from autofocus to manual focus on a camera. If the Focus Height is not set accurately, the laser spot will be blurred, and will cause the edges of your engraves to seem less sharp
- Changing the Focus Height also reduces the amount of energy the laser can put into your material, much like when focusing the sun through a magnifying glass. If the lens (or magnifying glass) is not in the right position, the energy from the laser (or sun) is spread over a wider area and the amount of heat that can be produced is reduced. As a result, engraves will be less deep, and the marks made when cutting and scoring will be less deep and wider.
Much like a newspaper print, using a grayscale option converts your artwork into a series of tiny dots. This is called dithering. The darker your artwork, the more dots that are produced and the more they overlap. The concentration and position of these dots translate visually into areas of white, gray, and black. The pattern density slider is key to getting a good result when using dithering and is explained in a later section of this tutorial.
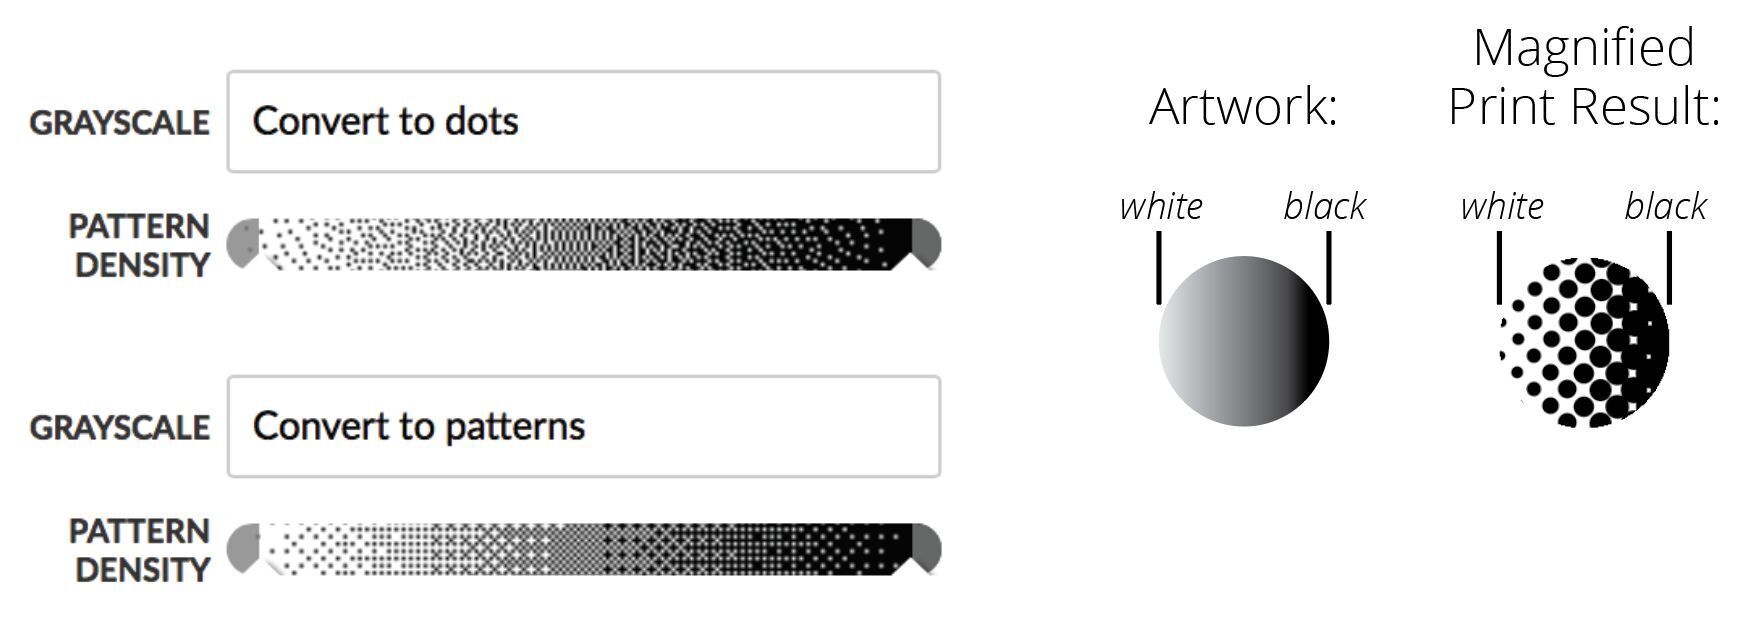
Convert to dots vs Convert to patterns Dots and patterns both translate your artwork into a series of tiny marks, but arrange these marks slightly differently.
- Convert to dots arranges the marks in a way that appears natural and random. We find this works best for engraving curvaceous and organic images, such as photographs.
- Convert to patterns arranges the marks in a much more orderly and structured way. This structure is sometimes visible and detracts from the quality of an engrave. You may find it works well for graphical images, such as images with lots of straight lines and edges.
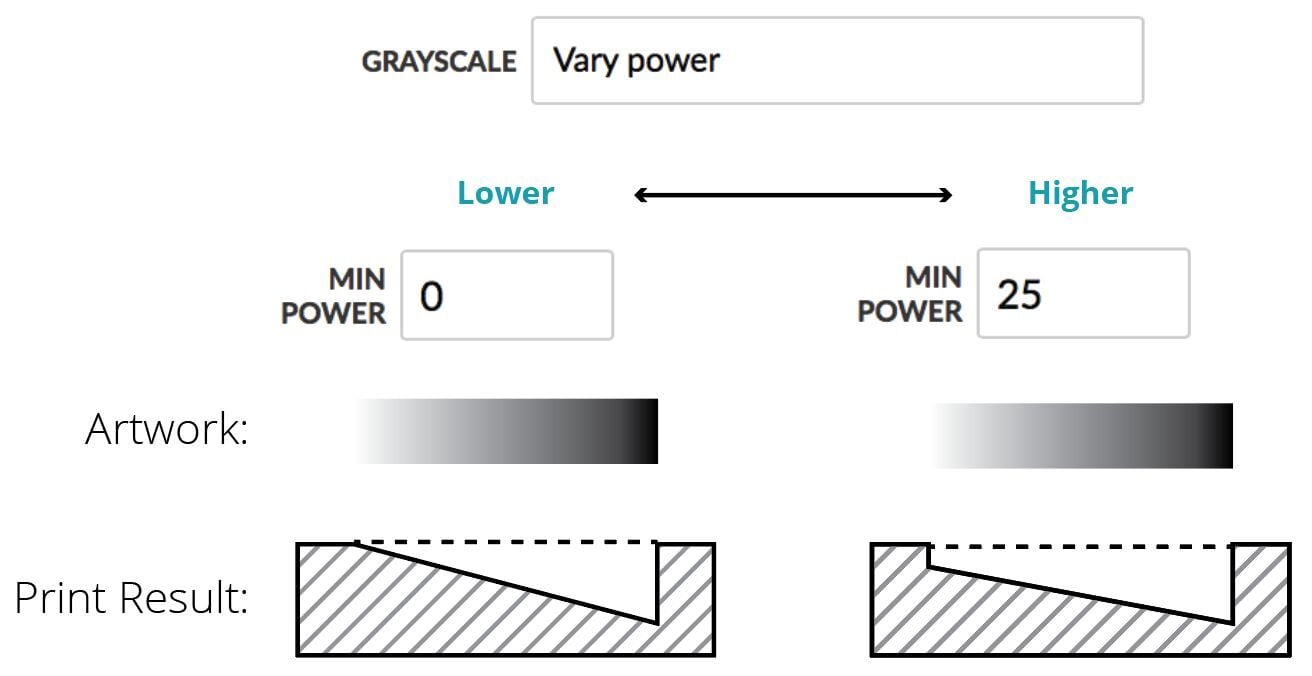
The Vary Power and Min Power settings control the maximum and minimum amount of power used during an engrave, based on the color of the uploaded artwork, the power level set, and the Min Power level defined. In its simplest form, when Vary Power is enabled, the chosen power level controls the depth of the darkest parts of your artwork, and Min Power controls the depth of the lightest parts. Pure white pixels are ignored regardless of the chosen settings.
If we take a gradient of 1-100% gray as an example, enable Vary Power, and set the Min Power to 0, the Glowforge printer will apply 1% of the power level to artwork that is 1% gray, 5% of the power level to artwork that is 5% gray, and 100% of the chosen power level to artwork that is 100% gray.
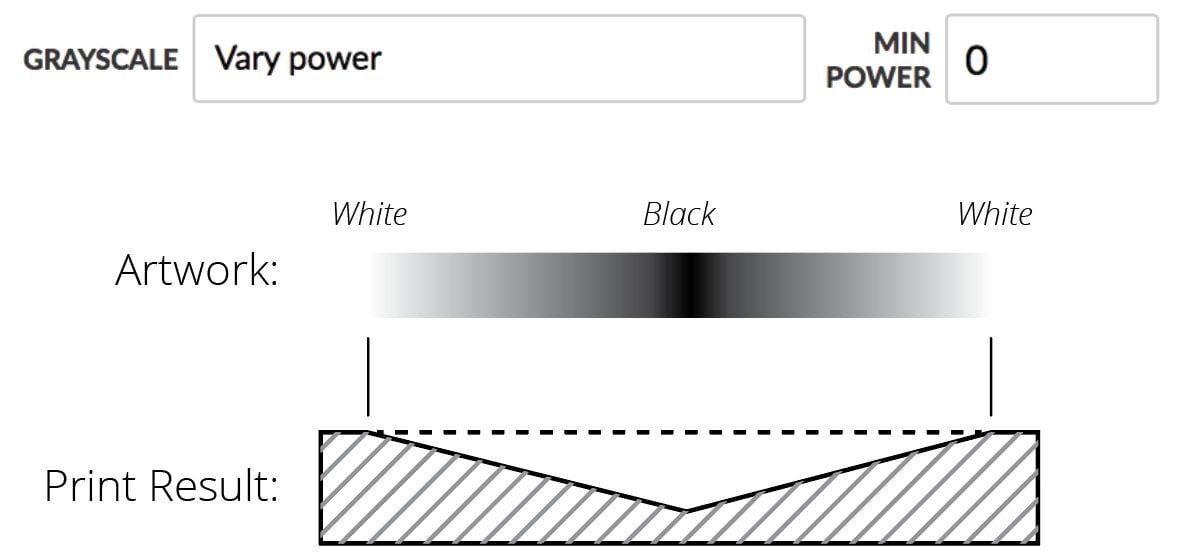
Taking the same 1-100% gray gradient but setting our power level to 80, and Min Power to 20 results in the darkest parts of our artwork being printed at 80 power, and the lightest parts being printed at 20% of 80.
Pattern Density
In conjunction with dithering, the Pattern Density can be used to make the light areas of your image appear darker or deeper, and the dark areas of your image lighter and less deep. It’s a powerful tool, especially when engraving photographs.
How does this affect my print?
Let’s assume we upload a photograph that includes both light and dark areas, and engrave it using full speed, 100 precision power, and Convert To Dots.
In this scenario, unless we have carefully processed our image to prepare it for engraving, we will likely find that the lightest areas in our image don’t make a mark on our material, and the darkest areas are very dark and deep, and may be merged together into a big brown blob.
If the lightest areas of our image don’t mark the material, increase the value of the left hand Pattern Density slider. This is somewhat equivalent to darkening the light areas of our image, which when combined with the Convert To Dots option, increases the concentration of dots within a given area, causing more of them to overlap, and visually translating to a darker print result.
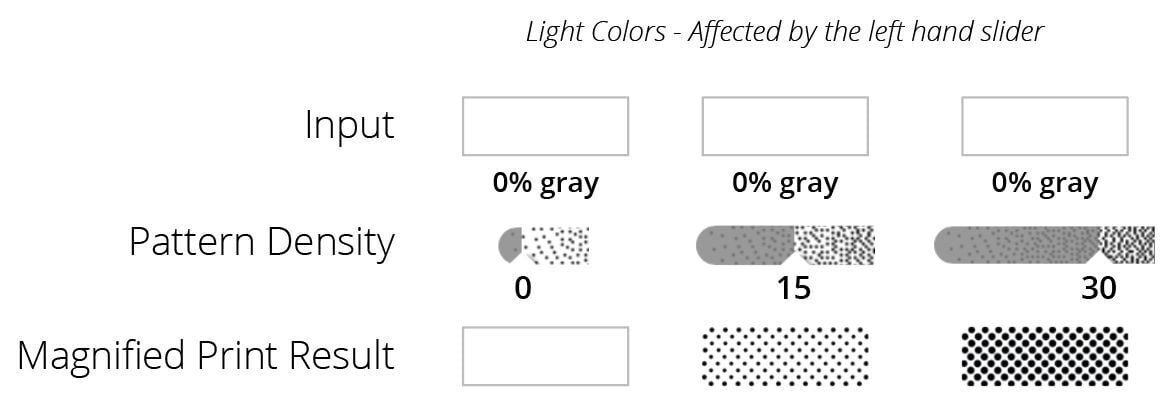
If the darkest areas of our image muddle together or are too deep, decrease the value of the right hand Pattern Density slider. This is somewhat equivalent to lightening the dark areas of our image, which when combined with the Convert To Dots option, decreases the concentration of dots within a given area, reducing the amount of times the dots overlap, and the depth of the engrave.

Testing and Saving New Settings
Printing on a huge variety of materials is exciting, but extreme caution is required. Beware that printing with custom settings creates a high risk of fire or damage to your Glowforge. Follow all instructions in the Glowforge user manual carefully and never print with your laser unattended.
Manual settings can be used on both Proofgrade materials (for custom effects) or on your own materials. When experimenting with new materials, run a small test print at minimum power first, and gradually increase the power until you achieve the desired result. Some materials behave unexpectedly when lasered, and it’s important to proceed with caution.
After dialing in a custom setting, save your parameters for use on any future designs.
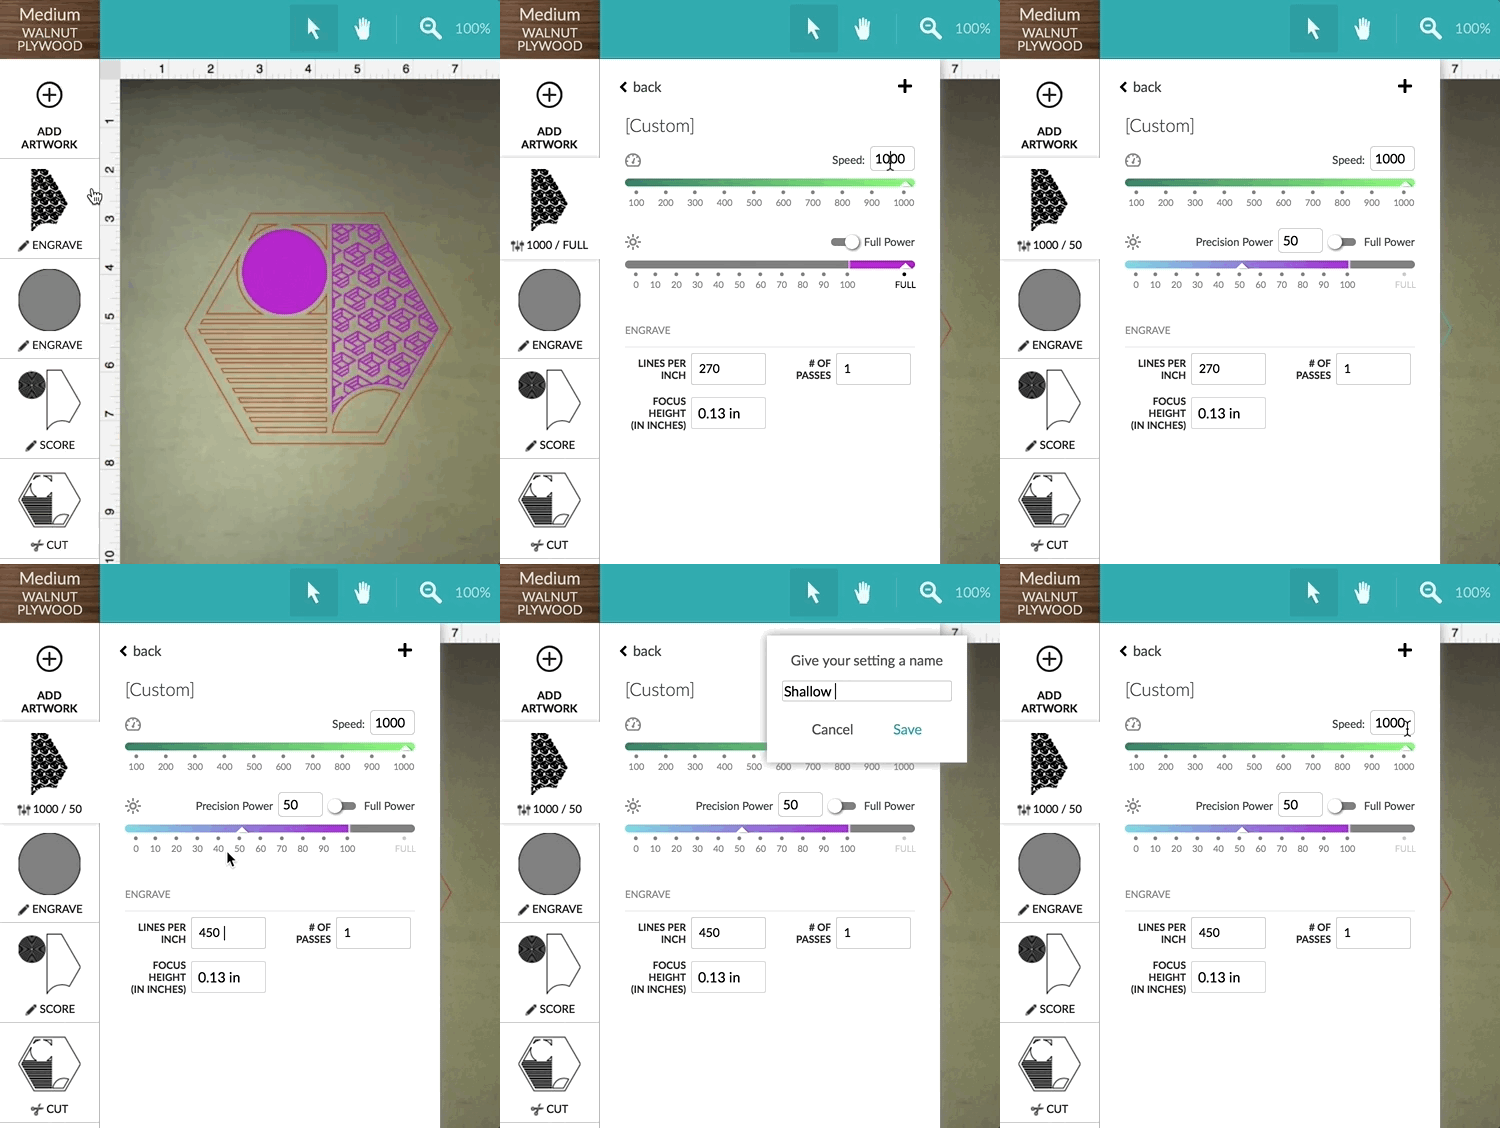
Saved settings are tied to a specific print operation. You can have a unique list of settings for Cut, Score, Vector Engrave and Bitmap Engrave. For each step, once you’ve selected the operation, you’ll see the list of available settings.
