Print the Smooth Curves Stencil Design
This article will show you how to create a fast and easy diagnostic print, called the Smooth Curves Stencil. It's made to test many Glowforge behaviors, from head speed to focus calibration. More than just a diagnostic print, though, it's a much-loved everyday tool for drafters, illustrators, and designers.
If you're here because your Pro Passthrough print didn’t align quite correctly, please do this test print and then email Glowforge Support. Doing so gives us more information about what's happening with your printer, so we can help you even faster.
Get the designGo to the Smooth Curves Stencil at shop.glowforge.com. You’ll follow the same process as purchasing a design, but this design is free of charge.
- Place a sheet of Medium Draftboard into the Pro Passthrough slot longways. Be sure to support the section protruding from the printer, so the material lies flat inside the printer.
- Double-check that the material lies completely flat against the crumb tray. Press gently on the material where it rests on the tray. If it’s flat, it shouldn’t move.
Note: It can help to use pins to hold the material flat. Some customers use small pieces of scrap to print these pins (available in the free laser design section). - On your Dashboard, open the Smooth Curves Stencil design.
- In the workspace, open the three-dot More menu, and make sure Pro Passthrough is turned on.
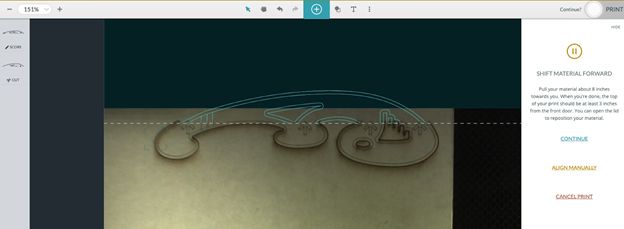
- Select the entire design, and arrange it so that the tips of the arrows touch the dotted line at the top of the work area, as shown below.

- Place your material on the printer bed, and select the type of material in the top left.
- Click print and run the first section of the design.
- After the first section completes, your Glowforge will inspect the design and take pictures to help with the alignment in the next step. Please do not move your material or open the lid until prompted by the onscreen instructions.
- After your Glowforge has taken the pictures, follow the onscreen instructions and move your material through the Pro Passthrough slot so the printed area is more than 3 in (7.6 cm) away from the front.
- Follow the prompts and run the 2nd portion of the test print.

-
If you are working with the support team on a specific issue, once the test print is complete, please reply to the email from support and send us photos of the front and back of the finished print, along with the date and time when you printed it.
- If you haven’t already, please contact Glowforge Support with the following information:
-
- Any photos you took during the troubleshooting steps above.
- A description of the trouble, including any screenshots you have from the app.
- The approximate date and time the problem began.
- A copy of the design file you were trying to print.
Once we have photos of your diagnostic print, we’ll review everything and follow up with next steps. Thank you in advance for running this test – it makes it much faster for us to get you the answers and fixes you need. You’d be amazed at how many mysteries are solved by a simple photo of a squiggly curve.